What’s Inside
- 1. Get Your Shed Sizing Right Before Anything Else
- 2. Flooring Makes or Breaks Your Entire Setup
- 3. Start With a Barbell and Plates, Not Cardio Equipment
- 4. Ventilation Isn’t Sexy But It’s Critical
- 5. Lighting Strategy That Actually Motivates
- 6. Mirror Placement for Form Checks
- 7. Temperature Control Beyond Just AC
- 8. Smart Equipment Spacing That Prevents Injuries
- 9. Storage Solutions That Keep Small Spaces Functional
- 10. Audio Setup That Actually Pumps You Up
- 11. Adjustable Equipment Over Single-Purpose Machines
- 12. The TV and Tech Setup Nobody Talks About
- 13. Personal Touches That Make Inside She Sheds Home Gym Setup Ideas Feel Like Yours
- 14. Maintenance Schedule That Prevents Expensive Problems
- 15. Budget Phasing That Builds Your Dream Gym Over Time
I spent three months researching inside she sheds home gym setup ideas before converting my own backyard shed last year, and honestly, most online advice is either too vague or completely impractical. After helping twelve friends design their own shed gyms since then, I’ve learned exactly what works and what’s a total waste of money.
The best inside she sheds home gym setup ideas balance realistic space planning with equipment you’ll actually use. I’ve seen too many people blow their budget on fancy machines that become expensive coat racks within three months.
Let me walk you through the exact setup strategies that create functional, motivating workout spaces. These aren’t Pinterest-perfect fantasy gyms. They’re real solutions from someone who trains clients in a converted shed five days a week.
1. Get Your Shed Sizing Right Before Anything Else

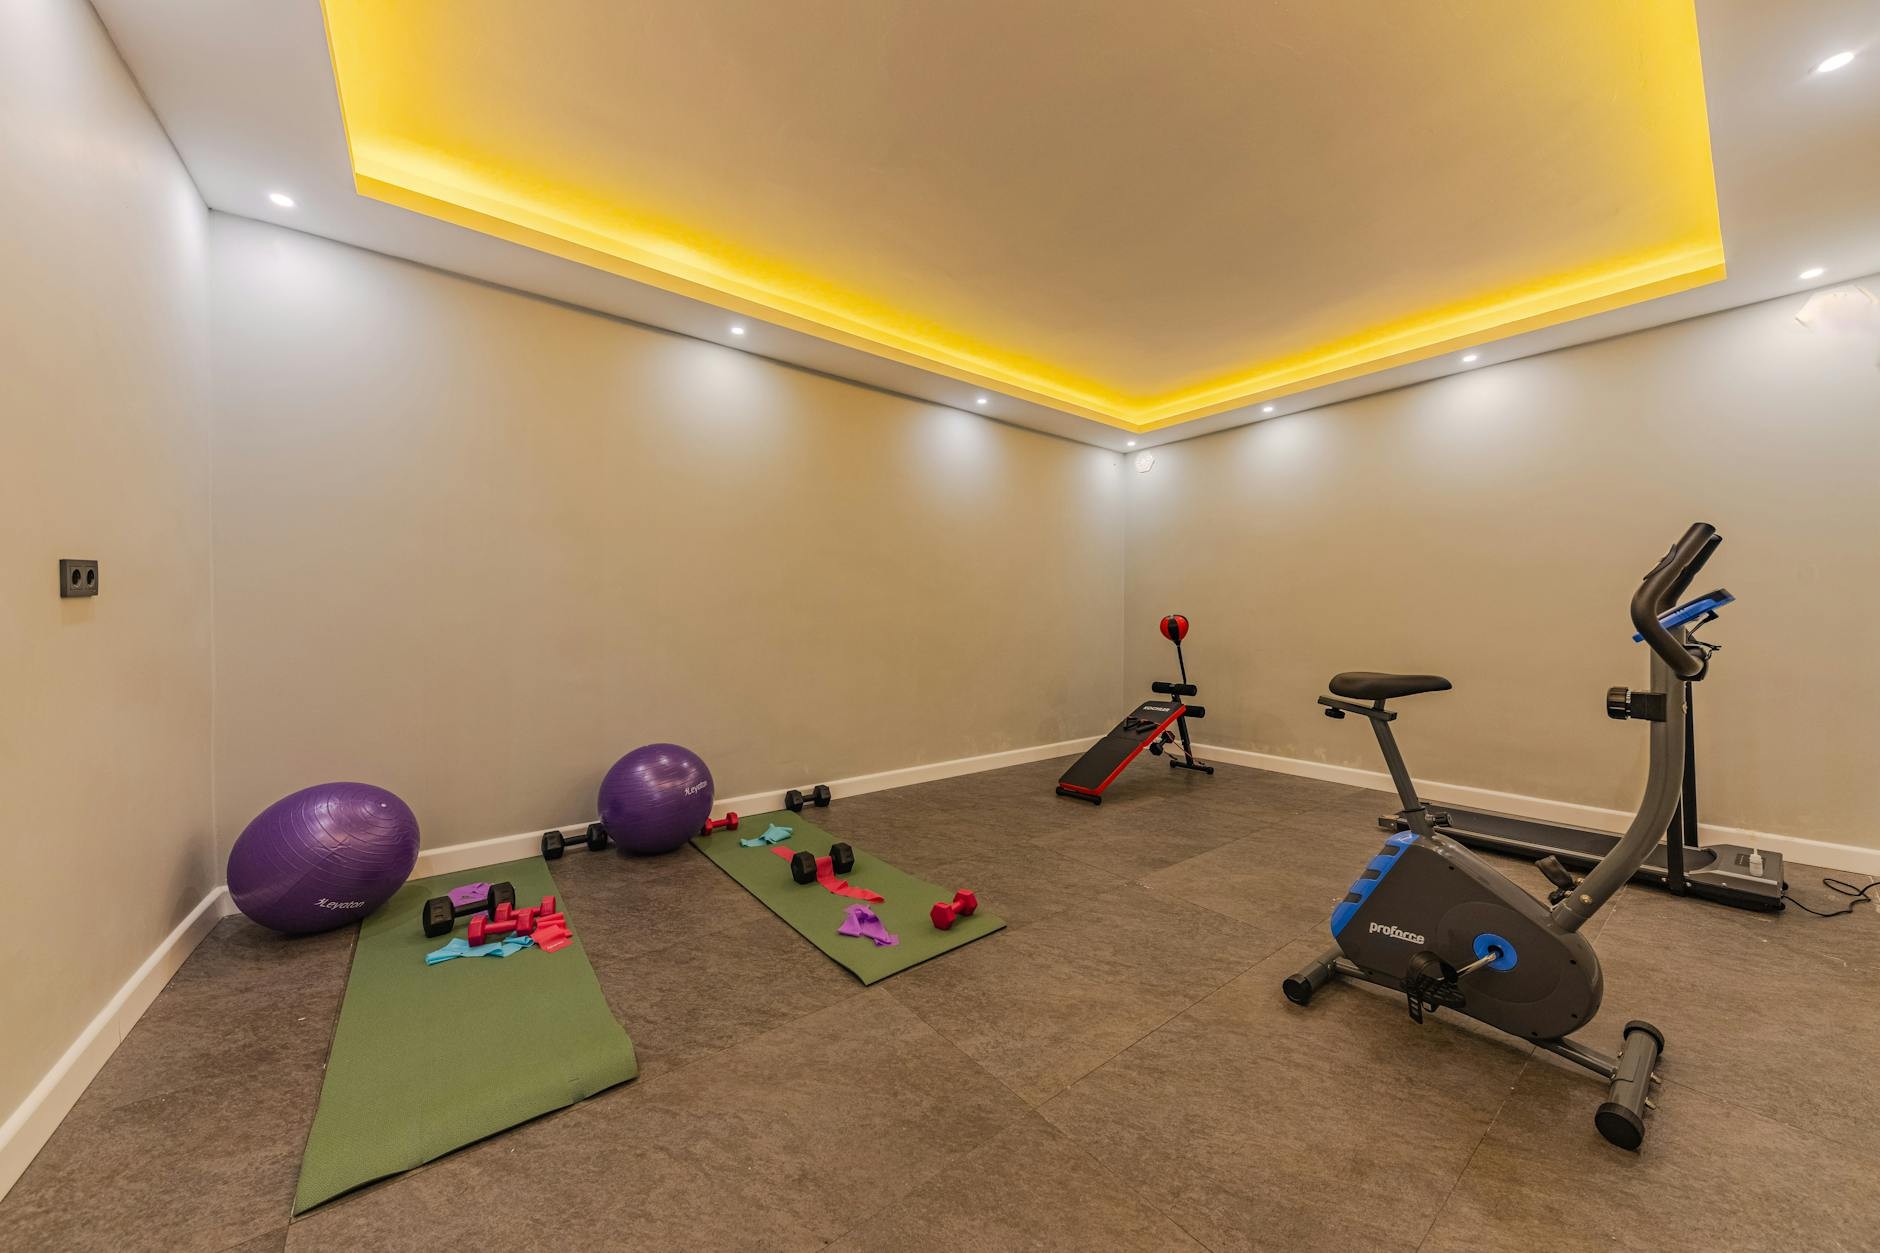
Most people guess at shed dimensions and regret it forever. An 8×8 shed works beautifully for yoga, stretching, and bodyweight training. I’ve trained in spaces this size, and honestly, it’s plenty if you’re not planning equipment-heavy workouts.
For mixing cardio and strength, 10×12 is the sweet spot. This size accommodates a treadmill (which needs roughly 30 square feet or 7 feet long by 3 feet wide), a compact power rack, and floor space for movements. My own shed is 10×12, and I’ve never felt cramped with a squat rack, adjustable bench, and full dumbbell set.
If you’re serious about building a complete training facility, go 12×16. This gives you room for multiple training zones without equipment crowding. I visited a client’s 12×16 setup last month that included a functional training area, a lifting platform, and a dedicated stretching corner with a massage gun station. The extra space meant she could invite friends for partner workouts without playing equipment Tetris.
Pro tip: Add two feet to whatever size you think you need. Equipment footprints are always bigger than the specs suggest once you account for movement space around them.
2. Flooring Makes or Breaks Your Entire Setup

I trained on bare plywood for exactly two weeks before my knees started screaming. Rubber gym flooring isn’t optional, it’s foundational. Horse stall mats from Tractor Supply run about $50 per 4×6 foot mat and are honestly better than most specialty gym flooring I’ve tested.
These 3/4-inch thick mats handle dropped weights, provide cushioning for jumping movements, and last forever. They smell like tire factory for about a week, so leave them outside first. I learned this the hard way when my shed smelled like a Goodyear plant for a month.
For yoga and stretching zones, layer an 8mm foam puzzle mat over the rubber. This costs around $30-40 for a 24-square-foot set at Dick’s Sporting Goods. The combination gives you firm support for lifting and soft comfort for floor work.
Common mistake: Skimping on flooring coverage. Cover the entire floor, not just under equipment. You’ll want to move things around as your training evolves, and patching flooring later is annoying and looks terrible.
3. Start With a Barbell and Plates, Not Cardio Equipment

Every beginner wants to buy a treadmill first. Don’t. A quality barbell, Olympic bumper plates, and open floor space give you infinitely more exercise options. I personally swear by the Rogue Ohio Bar ($295) or the more budget-friendly CAP Barbell Olympic set from Amazon ($250).
Start with 160-200 pounds of bumper plates. You can find sets at Rogue Fitness, Rep Fitness, or even Walmart’s website. Bumpers let you safely drop weights and they’re quieter than iron plates, which matters when your shed is 15 feet from your neighbor’s bedroom window.
This foundation covers squats, deadlifts, presses, rows, and hundreds of variations. Add a simple squat stand (not a full power rack yet) for $150-200. The Fitness Reality 810XLT from Amazon works great and doesn’t eat up your entire shed.
I added my first cardio machine nine months after starting, once I knew exactly how I’d use it. Most of my clients who bought treadmills first barely touched them after the novelty wore off.

Pull Up Assistance Bands
Pull Up Assistance Bands has been one of the most consistently praised picks in this category. 416 reviewers averaged 4.5/5.
4. Ventilation Isn’t Sexy But It’s Critical

My first shed gym had one tiny window. By minute ten of any workout, I was breathing soup. Proper airflow makes the difference between a space you love and one you avoid.
Install at least two windows on opposite walls for cross-breeze. I added a third window on my shed’s back wall and the difference was dramatic. Windows from Home Depot run $80-150 for basic vinyl models that include screens.
Add a 20-inch box fan ($30 at Lowe’s) mounted high on one wall. This creates air circulation even on still days. During summer, I run two fans and honestly, it’s comfortable until about 85 degrees outside.
For serious climate control, a mini-split AC unit changed my life. Installation runs $600-1,200 depending on your area. I resisted this expense for six months, thinking fans would be enough. They weren’t. The AC paid for itself in consistent workouts instead of skipped sessions because it was too miserable.
Roof vents are another option if you’re on a tight budget. They cost $40-80 installed and help hot air escape naturally.
5. Lighting Strategy That Actually Motivates

Dim lighting kills motivation faster than anything. I installed LED shop lights from Costco (two 4-foot fixtures for $35 each) and the brightness completely changed the energy of my space.
Position lights to eliminate shadows in your main training area. I mounted mine parallel to my lifting platform so I never have shadows obscuring my form in the mirror.
Add a small lamp or string lights for cooldown and stretching sessions. The ability to dim things down after intense training helps with recovery mindset. I found battery-operated LED strips at Target for $20 that stick anywhere and last months on one charge.
Natural light matters too. Windows positioned to catch morning sun make early workouts less painful. My east-facing window gets sunrise light that honestly makes 6 AM training sessions feel less brutal.
Pro tip: Install lights before you move in equipment. Trying to mount fixtures around a power rack is miserable.
6. Mirror Placement for Form Checks

Cheap door mirrors from Walmart ($15 each) work perfectly. I mounted three side-by-side on my longest wall for about $45 total. This gives me a 6-foot-wide reflection for form checks during squats and deadlifts.
Position mirrors where you’ll actually use them. Mine are directly in front of my lifting platform, not off to the side where I’d have to turn my head mid-set. This seems obvious but I’ve seen so many poorly placed mirrors in client sheds.
Mount them securely to studs, not just drywall. A falling mirror during a heavy set could be catastrophic. I used heavy-duty picture hanging strips rated for 16 pounds per strip, applying four strips per mirror.
Skip the expensive gym mirrors from specialty retailers. They’re literally the same glass as cheap door mirrors, just marketed differently. Save that $200 for actual equipment.
Adjustable Dumbbells Set of 2,Free Weights Dumbbells
Adjustable Dumbbells Set of 2,Free Weights Dumbbells Set,Adjustable Du has been one of the most consistently praised picks in this category. 24 reviewers averaged 4.5/5.
7. Temperature Control Beyond Just AC

Insulation transforms a shed from a seasonal space to a year-round gym. I used R-13 fiberglass batts from Home Depot ($60 for enough to do my 10×12 shed) and installed them myself in a weekend.
Insulate walls, ceiling, and even the door if possible. The door was my biggest heat loss point until I added a foam board panel. This cost $15 and took twenty minutes.
Insulated windows make a huge difference too. My original single-pane windows created condensation problems and temperature swings. Upgrading to double-pane models ($120 each) solved both issues.
For winter training, a small space heater works great. I use a 1500-watt ceramic heater from Amazon ($40) that heats my shed to comfortable temps in about fifteen minutes. Just make sure your shed’s electrical can handle it.
Common mistake: Over-relying on AC or heat without addressing insulation first. You’re just heating or cooling the outdoors at that point.
8. Smart Equipment Spacing That Prevents Injuries

A power rack needs a 4×6 foot footprint minimum, but that’s just the equipment itself. Add another two feet on all sides for safe movement. My rack sits in a 8×10 foot zone, which sounds excessive until you’re bailing out of a failed squat.
Stationary bikes require about 10 square feet or roughly 4 feet by 2 feet. Position yours where you can watch a screen comfortably. I mounted a TV bracket at eye level when seated, which beats craning your neck to see a poorly placed monitor.
Leave a 6×8 foot open area for bodyweight movements, stretching, and floor exercises. This was the smartest decision I made. Having dedicated floor space means I actually do warmups and cooldowns instead of skipping them because there’s no room.
Map your layout on graph paper before moving anything in. I rearranged my equipment three times the first week because I didn’t plan traffic flow. Learn from my sore back.
9. Storage Solutions That Keep Small Spaces Functional

Wall-mounted plate storage saves massive floor space. I built a simple 2×4 frame with pipe holders for $35 in materials from Home Depot. It holds 300 pounds of plates and keeps them organized at grabbing height.
Dumbbell racks are worth buying, not building. A three-tier rack from Amazon ($120) holds 15 pairs of dumbbells in a 3×2 foot footprint. I tried making my own and it wobbled dangerously under load.
Install shelving above eye level for accessories like resistance bands, jump ropes, and foam rollers. I used simple wire shelving from Lowe’s ($25 per 4-foot section) and it’s held up perfectly for two years.
Resistance bands hang on command hooks ($8 for a pack at Target). I have six hooks along one wall organizing bands by resistance level. This beats digging through a bin every workout.
Pro tip: Store your most-used equipment at waist height. Bending down to grab dumbbells fifty times per workout gets old fast.

Resistance Bands for Working Out
Resistance Bands for Working Out punches above its price — 278 buyers rated it 4.5 stars. I would buy it again.
10. Audio Setup That Actually Pumps You Up

A quality Bluetooth speaker matters more than you’d think. I use a JBL Charge 5 ($150 at Best Buy) that’s waterproof, loud enough to hear over fan noise, and has 20-hour battery life.
Position speakers at head height or higher. Bass sounds muddy when speakers sit on the floor. I mounted mine on a shelf using Command strips and the sound quality improved dramatically.
For serious audio, consider outdoor speakers wired to a small amp. This costs $200-300 total but delivers gym-quality sound. My client who went this route says it’s his favorite upgrade.
Honestly, avoid TV sound for music. The audio quality from most small TVs is terrible for workout motivation. Use the TV for form videos and programming, but play music through dedicated speakers.
11. Adjustable Equipment Over Single-Purpose Machines

An adjustable bench beats three fixed benches. I use the Rep Fitness AB-3000 ($250) that goes from decline to 90-degree positions. This one piece replaced four different benches I was considering.
Adjustable dumbbells like PowerBlocks or Bowflex SelectTech save enormous space. A set running 5-50 pounds costs $300-400 but replaces ten pairs of fixed dumbbells. I was skeptical about the adjustment mechanism, but after 18 months of heavy use, mine still work perfectly.
A cable system attachment for your power rack adds hundreds of exercises. I added the Spud Inc. Pulley System ($180) to my rack and it’s my most-used accessory. Cable work for shoulders and back is way more joint-friendly than I expected.
Resistance bands with a door anchor provide variable resistance training for under $40. I keep a set from Rogue Fitness hanging by the door for quick arm workouts between clients.
12. The TV and Tech Setup Nobody Talks About

Mount a TV where you’ll use it most. Mine sits at eye level when I’m on my stationary bike, which is where I watch training programs. For lifting, I mostly use my phone propped on a small stand.
A basic 32-inch TV from Walmart ($150) is plenty. I see people dropping $500 on huge screens for sheds and honestly, you’re not hosting movie night out here. Save that money for equipment.
Wi-Fi extenders are essential if your shed is far from your router. I use a TP-Link extender ($35 on Amazon) that brings solid signal to my shed 40 feet from the house.
A tablet mount on your power rack beats holding your phone during sets. I use a cheap gooseneck mount ($15) that clamps to my rack’s upright. Perfect for following workout apps or recording form videos.
Common mistake: Mounting the TV too high. Your neck will hate you during 45-minute cycling sessions if you’re constantly looking up.

FITPLAM Adjustable dumbbell set
FITPLAM Adjustable dumbbell set punches above its price — 12 buyers rated it 4.5 stars. I would buy it again.
13. Personal Touches That Make Inside She Sheds Home Gym Setup Ideas Feel Like Yours

Motivational artwork matters more than I expected. I hung three framed prints from Etsy ($30 total) with quotes that actually resonate with me, not generic fitness garbage. Seeing “Consistency beats intensity” every workout genuinely helps on low-motivation days.
Plants make the space feel less like a garage. I keep three low-maintenance snake plants ($15 each at Home Depot) that survive my neglect and improve air quality. They’re also nearly impossible to kill, which fits my plant care skills.
A small shelf for personal items creates a locker-room vibe. I keep a photo of my first powerlifting meet, my gym towel, and my favorite water bottle there. It’s silly but it makes the space mine.
Paint color affects energy more than you’d think. I went with a light gray-blue that feels calm but energizing. Skip pure white (shows every dirt mark) and dark colors (makes small spaces feel smaller).
14. Maintenance Schedule That Prevents Expensive Problems

Check your shed’s roof twice yearly for leaks. Water damage ruins equipment fast. I caught a small leak last spring that would’ve destroyed my barbell if I’d waited another month.
Sweep and mop floors weekly. Rubber flooring collects dust and chalk that becomes slippery. I use a simple dust mop ($20 at Target) and it takes five minutes to keep things safe.
Lubricate equipment quarterly. Barbell sleeves, cable pulleys, and adjustment mechanisms all need occasional maintenance. I use 3-in-1 oil ($5 at any hardware store) and spend twenty minutes every three months keeping everything smooth.
Inspect electrical connections monthly. Sheds experience more temperature swings than houses, which can loosen connections. I’ve found two loose outlets that could’ve caused problems if ignored.
Pro tip: Keep a maintenance log in your phone. I set quarterly reminders for deep cleaning and equipment checks. Sounds excessive but it’s prevented several expensive repairs.
15. Budget Phasing That Builds Your Dream Gym Over Time

Start with $1,500 for essentials: flooring, barbell, plates, and basic rack. This gets you training immediately while you save for upgrades. I started exactly here and trained effectively for four months before adding anything.
Phase two ($800-1,000) adds climate control and lighting. This transforms your shed from functional to comfortable. I added my AC unit and LED lights in month five and my workout consistency immediately improved.
Phase three ($500-800) brings adjustable dumbbells, bench, and storage solutions. By this point, you know exactly what you need based on your actual training patterns, not guesses.
Phase four ($400-600) covers tech, mirrors, and personal touches. These are the finishing details that make your space truly yours. I’m still in this phase, slowly adding small improvements as I find deals.
Honestly, this phased approach beats dropping $5,000 at once and buying equipment you’ll never use. I’ve seen too many friends with expensive rowing machines gathering dust because they bought everything immediately.
The inside she sheds home gym setup ideas that work best are the ones you’ll actually use consistently. Start small, focus on quality basics, and expand as you discover your real training needs. My shed gym gets used five times more than my old commercial gym membership ever did, and it cost less than two years of that membership.
Save this guide and come back to it as you build out your space. I promise you’ll reference these measurements and equipment recommendations multiple times during your setup process. Pin it so you can find it when you’re standing in Home Depot trying to remember how much insulation you need.

WHATAFIT Resistance Bands
Honestly, WHATAFIT Resistance Bands surprised me — sturdier than it looks in the photos, and over 356 buyers gave it 4.5 stars.
Frequently Asked Questions
What size shed do I need for a home gym?
An 8×8 shed works perfectly for yoga and bodyweight training. If you want cardio equipment and weights, go with 10×12. I personally recommend 12×16 if you have the space and budget, since it gives you room to grow your equipment collection without feeling cramped.
How much does it cost to convert a shed into a gym?
Budget $2,000-5,000 for a basic setup including flooring, insulation, lighting, and starter equipment. If you’re adding AC, high-end equipment, or custom finishes, expect $8,000-15,000. I started with just $1,500 and added pieces over six months as I figured out what I actually used.
Do I need climate control in a shed gym?
Depends on your location. I trained in an uninsulated shed one Texas summer and nearly died. Insulation is non-negotiable if you experience temperature extremes. A mini-split AC unit runs $600-1,200 installed and makes your space usable year-round, which means you’ll actually work out consistently.
What equipment should I buy first for a shed gym?
Start with a barbell, Olympic bumper plates, and quality flooring. These three items give you hundreds of exercise options. Then add adjustable dumbbells and a flat bench. Resist the urge to buy cardio equipment first unless you’re absolutely certain you’ll use it regularly.