What’s Inside
- 1. Get the Right Power Rack for Low Ceilings (This Saves Your Workouts)
- 2. Flood Your Space with Serious Lighting (10,000 Lumens Minimum)
- 3. Run a Dehumidifier 24/7 (Your Equipment Will Thank You)
- 4. Use Horse Stall Mats Instead of Expensive Gym Flooring
- 5. Install Dedicated 20-Amp Circuits for Cardio Equipment
- 6. Paint Walls Bright White (Seriously, Just Do It)
- 7. Mount Full-Wall Mirrors for Form Checks and Visual Space
- 8. Choose a Versatile Six-Post Rack for Compact Spaces
- 9. Add Crash Cushions Around Your Rack for Wall Protection
- 10. Zone Your Space Strategically (Don’t Just Cram Everything In)
- 11. Mount Storage on Walls to Reclaim Floor Space
- 12. Choose Padded Plyo Boxes to Prevent Shin Disasters
- 13. Invest in Quality Plates (Iron vs. Bumpers Breakdown)
- 14. Install Dimmer Switches for Adaptable Lighting Moods
- 15. Check Bedroom Proximity and Add Acoustic Underlayment
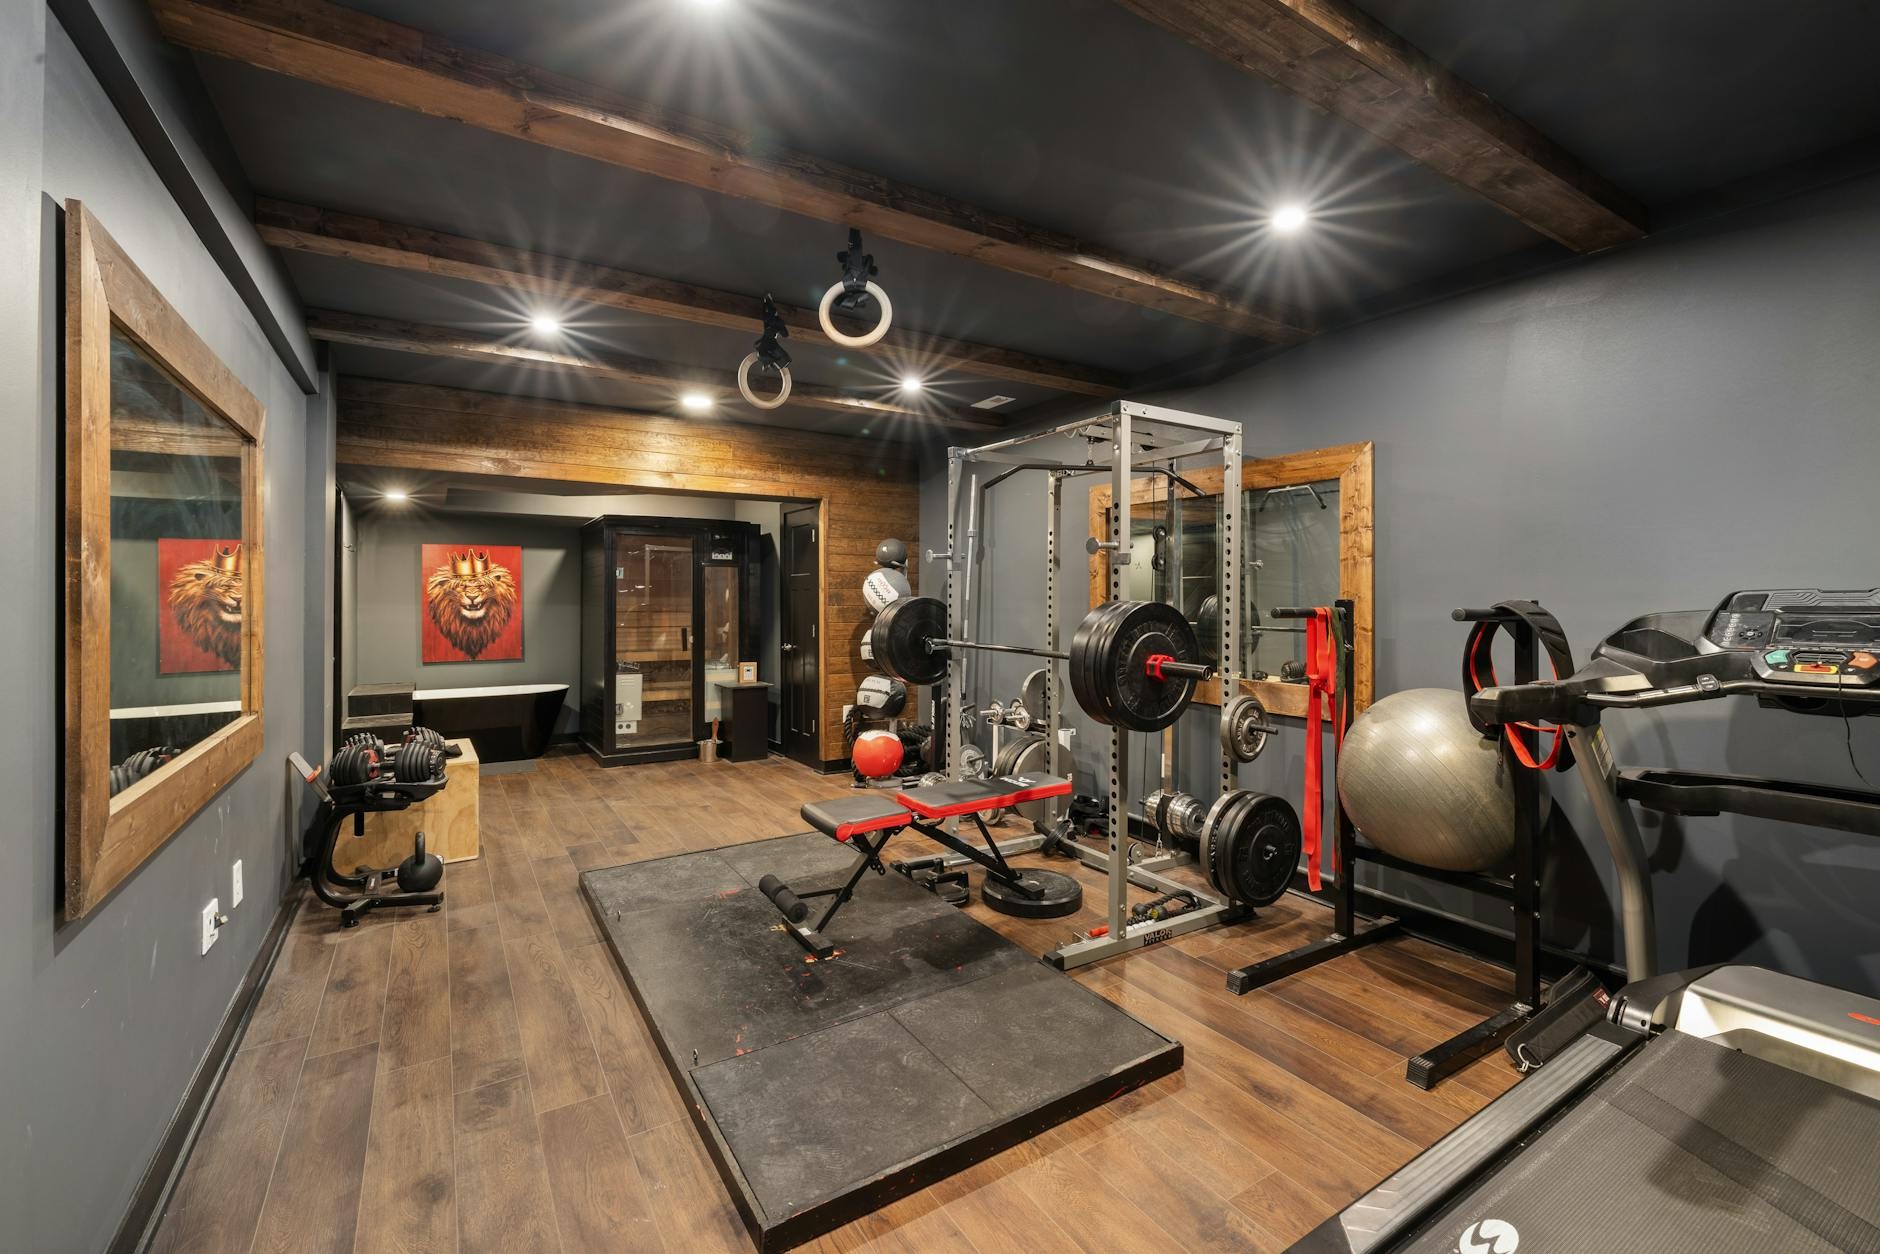
I spent six months working out in what I affectionately called “the dungeon” before I figured out that my dark basement didn’t have to feel like a punishment chamber. Most people think dark basements home gym setup ideas require major renovations or thousands in construction costs, but honestly, strategic tweaks make way more difference than gutting the space. My turning point came when I realized I was skipping workouts simply because the environment depressed me before I even picked up a weight.
Here’s what actually works when you’re dealing with concrete walls, low ceilings, and lighting that makes everything look gray.
1. Get the Right Power Rack for Low Ceilings (This Saves Your Workouts)

Most people screw this up immediately. They order a standard 85-inch power rack, realize it won’t fit their 7.5-foot basement ceiling, and then spend months doing half-squats or avoiding overhead presses entirely.
I personally installed the 72-inch Hydra power rack from Bells of Steel in my space, and it changed everything. This thing is specifically designed for basements under 8 feet. You can do full overhead presses, pull-ups, and rack squats without modifying a single movement or worrying about punching holes in your drywall.
The common mistake I see is people thinking they can “make it work” with a taller rack. They can’t. You’ll either damage your ceiling or constantly adjust your programming, which kills consistency. The Hydra runs around $600-800 depending on attachments, and it’s built solid enough for serious lifting. Measure your ceiling height twice before ordering anything. Subtract 6 inches from your measurement to account for your head clearance during movements. That’s your maximum rack height, period.
2. Flood Your Space with Serious Lighting (10,000 Lumens Minimum)

This was my biggest game-changer. I initially tried working out with the single 60-watt bulb that came with the basement. It was miserable. Dim lighting doesn’t just make it hard to see. It actually depresses your motivation and makes it nearly impossible to check your form in mirrors.
Target 10,000 lumens of LED shop lights across a 400 sq ft space. I use linkable fixtures at 5,000-6,500K color temperature mounted directly to my ceiling joists. This creates that bright, commercial gym feel that tricks your brain into thinking you’re in a professional space instead of a cave.
The color temperature matters more than most people realize. Anything below 4,000K looks yellowish and dingy. Above 6,500K feels too clinical and harsh. That 5,000-6,500K range hits the sweet spot where everything looks clean and energizing. I spent about $200 on four linkable LED shop lights from Home Depot, and they’ve been running for two years without issues. Mount them perpendicular to your workout area so you don’t create shadows when you’re under the bar.
3. Run a Dehumidifier 24/7 (Your Equipment Will Thank You)

Nobody talks about this enough. I ruined my first barbell because I thought opening a window occasionally would handle moisture. Wrong. Basements hold humidity like a sponge, and that moisture destroys equipment faster than you’d believe.
Keep humidity below 50% by running a dehumidifier continuously. I use a 50-pint model that costs about $200, and I empty it every other day. Ventilation alone doesn’t cut it in basements because the concrete walls constantly release moisture, especially in older homes.
Pro tip from every experienced lifter I know: this matters more than any other environmental factor for equipment longevity. My barbell knurling stayed sharp, my plates didn’t develop surface rust, and even my resistance bands lasted twice as long. The dehumidifier pays for itself within a year just in prevented equipment replacement. Set it to 45% humidity and forget about it. Check the bucket daily until you learn your basement’s pattern, then adjust your emptying schedule accordingly.

WHATAFIT Resistance Bands
WHATAFIT Resistance Bands punches above its price — 356 buyers rated it 4.5 stars. I would buy it again.
4. Use Horse Stall Mats Instead of Expensive Gym Flooring

I’m going to save you hundreds of dollars right now. Forget those fancy interlocking gym tiles. Head to Tractor Supply and buy 4×6-foot horse stall mats at 3/4-inch thickness for about $40 each.
These things are indestructible. They’re designed for 1,200-pound horses stomping around, so your deadlifts won’t even register. They absorb drops better than foam, reduce noise transmission to upstairs rooms significantly, and they don’t shift around like puzzle mats do.
I covered my 200 sq ft lifting area with six mats for $240 total. Gym-specific rubber would have cost me $600-800 for the same coverage. The only downside is they smell like rubber for about two weeks. Leave them outside in the sun for a day or two before installation, or just deal with it. The smell fades completely.
Common mistake: people try to save money with thinner mats. Don’t. The 3/4-inch thickness is crucial for impact absorption and noise reduction. Anything thinner just transfers shock straight through to your concrete, which defeats the purpose and annoys everyone upstairs.
5. Install Dedicated 20-Amp Circuits for Cardio Equipment

I learned this one the expensive way. I plugged my treadmill into a standard 15-amp circuit and kept tripping the breaker mid-sprint. Turns out, treadmills pull serious power during high-intensity intervals.
Dedicate 20-amp circuits for any cardio machines, positioning outlets every 8-10 feet around your space. This isn’t just about convenience. Overloading 15-amp lines creates a legitimate fire risk during extended use sessions when motors heat up.
I hired an electrician for $400 to run two new 20-amp lines in my basement. He positioned outlets on opposite walls so I could rearrange equipment without extension cords everywhere. If you’re handy with electrical work and your local codes allow it, this is a manageable DIY project. Just make sure everything’s properly grounded and inspected.
Pro tip: label your breaker box clearly so you know which circuits power your gym. When you inevitably need to reset something, you won’t be flipping random switches in the dark.
6. Paint Walls Bright White (Seriously, Just Do It)

This sounds too simple to matter, but painting my concrete walls Behr Marquee Cameo White instantly made my basement feel 30% larger and infinitely less depressing. I also painted the overhead beams dark gray to hide rust and pipes, which creates this clean industrial look without drywalling anything.
Unfinished basements look dingy because concrete absorbs light. White paint reflects it back, effectively doubling your lighting investment. I used three gallons at $45 each and knocked it out in a weekend with a paint sprayer.
The psychological difference is massive. I went from dreading workouts in a gray cave to actually looking forward to training sessions. My friends who visit always comment on how bright and clean the space feels, even though it’s still technically an unfinished basement.
Skip the expensive epoxy floor coatings unless you’re really committed. Focus your paint budget on walls where it makes the biggest visual impact. The horse stall mats cover your floor anyway, so epoxy is just burning money for a basement gym setup.

Pull Up Assistance Bands
Pull Up Assistance Bands punches above its price — 416 buyers rated it 4.5 stars. I would buy it again.
7. Mount Full-Wall Mirrors for Form Checks and Visual Space

I mounted 4×8-foot mirror panels opposite my power rack, and it completely transformed both my training and the perceived size of my space. Mirrors serve double duty in dark basements home gym setup ideas: they let you check form during lifts and they create the illusion of depth that makes cramped spaces feel bigger.
I went with shatterproof acrylic versions after reading about glass mirrors exploding from dropped weights. They cost about $150 per panel at Home Depot, and I used construction adhesive plus J-channel mounting for security. The acrylic is lighter and safer than glass, though it scratches easier if you’re careless.
Position mirrors where you can see your full body during squats, deadlifts, and overhead presses. I placed mine 6 feet away from my rack, which gives me perfect sightlines without being so close that I’m constantly adjusting position to stay in frame.
Common mistake: mounting mirrors too high. Your reflection should start at knee height so you can check squat depth and deadlift setup. Most people mount them at eye level and miss half their body during movements.
8. Choose a Versatile Six-Post Rack for Compact Spaces
If you’ve got the ceiling height (80 inches minimum) and want maximum versatility in a compact footprint, the PR-4000 six-post power rack from REP Fitness is worth the $1,200-1,500 investment. I don’t own this one personally, but I’ve trained in three home gyms that do, and it’s impressive.
The six-post design lets you attach a ton of accessories without sacrificing workout space. Pair it with the AB-5200 adjustable bench, and you’ve got everything you need for serious strength training in about 200 sq ft. The rack accommodates multiple users simultaneously, which matters if you’re training with a partner or family members.
What I like about REP’s design is the attention to storage integration. You can mount plate holders, band pegs, and accessory attachments directly to the frame without drilling into your walls. This keeps everything organized and accessible without cluttering your limited floor space.
The only downside is weight. This thing is 400+ pounds assembled, so you’re committing to its location. Make sure you’ve finalized your layout before assembly because moving it later is a massive pain.
9. Add Crash Cushions Around Your Rack for Wall Protection
I discovered AbMat crash cushions through a powerlifting buddy, and they’ve saved my walls multiple times. A set of four runs about $100, and they’re specifically designed to absorb impact from dropped plates or missed lifts.
These originated in log training but work perfectly for home gyms where space is tight and walls are close. I position them at the corners of my lifting platform where errant plates are most likely to travel. They’ve prevented at least a dozen drywall repairs over the past year.
The foam density is key. Cheap crash pads compress too much and don’t really protect anything. AbMat uses high-density foam that actually stops plates from bouncing into walls while being soft enough not to damage the plates themselves.
Pro tip: if you’re doing Olympic lifts in a basement, these are non-negotiable. Even with perfect form, you’ll occasionally miss a snatch or clean, and plates travel fast. The $100 investment beats $500 in drywall repairs every time.

FEIERDUN DS2 Adjustable Dumbbells
FEIERDUN DS2 Adjustable Dumbbells has been one of the most consistently praised picks in this category. 47 reviewers averaged 4.5/5.
10. Zone Your Space Strategically (Don’t Just Cram Everything In)

This is where most people fail. They buy all the equipment they want and then try to squeeze it into whatever space they have. That’s backwards and dangerous.
I zone my 230 sq ft basement gym like this: 100 sq ft for strength (power rack plus 20kg Colorado Bar from REP at $300), 80 sq ft for cardio (my rower), and 50 sq ft for storage. This prevents the cramped feeling that leads to 30% more injuries from tripping over dumbbells or clipping plates on walls.
Each zone has clear boundaries. My strength area is defined by the horse stall mats. My cardio zone sits on the bare concrete since rowers don’t need cushioning. Storage stays along one wall with everything mounted or stacked vertically.
The mistake I see constantly is people buying equipment before planning zones. They end up with a treadmill blocking their squat rack or dumbbells scattered everywhere because there’s no designated storage. Plan your zones first, then buy equipment that fits those zones. Not the other way around.
11. Mount Storage on Walls to Reclaim Floor Space

Floor space is premium in basements. I use wall-mounted storage like REP USA Accessory Straps and Darkco mounts for bands, TRX systems, and jump ropes. This keeps everything accessible without sacrificing the room I need for actual movements.
The 2026 trend I’m seeing in home gym tours is dual Voltra setups for cable work, but honestly, those take up less space than traditional cable machines while offering similar functionality. I mounted mine to studs using lag bolts, and they’ve held up to two years of daily use without budging.
Common mistake: people use those cheap plastic hooks from hardware stores. They fail under load and dump your expensive equipment on the floor. Invest in proper gym-specific mounts that are rated for the weight you’re hanging. I spent $80 on quality mounts, and they’ve been bulletproof.
I keep resistance bands, ab wheels, foam rollers, and all my small accessories on wall mounts. This probably saves me 20 sq ft of floor space that would otherwise be cluttered with bins and baskets.
12. Choose Padded Plyo Boxes to Prevent Shin Disasters

I’ve got scars on my shins from wooden plyo boxes. Learn from my stupidity and get padded versions from the start. Titan Fitness makes 3-in-1 padded boxes for about $150 that offer three different heights without taking up three times the storage space.
The padding makes a psychological difference too. I’m way more willing to push my box jump height when I know a miss won’t shred my shins. This matters in basements where concrete floors make falls even more punishing than in commercial gyms with cushioned flooring.
Uneven concrete is another basement-specific issue. Wooden boxes rock and wobble on anything less than perfectly flat surfaces, which creates hesitation and stalled progress. Padded boxes have enough give to compensate for minor irregularities without compromising stability.
I keep mine in the cardio zone since box jumps are more conditioning than strength work. The 20-24-30 inch heights cover everything I need for both explosive training and step-ups during active recovery days.
Adjustable Dumbbells Set of 2,Free Weights Dumbbells
Adjustable Dumbbells Set of 2,Free Weights Dumbbells Set,Adjustable Du has been one of the most consistently praised picks in this category. 24 reviewers averaged 4.5/5.
13. Invest in Quality Plates (Iron vs. Bumpers Breakdown)

Here’s my honest take after using both: iron plates make more sense for most basement gyms. I use the 425 lb USA-Made Equalizer iron plates from REP at $600 for the set, and they’ve been perfect.
Bumpers cost $800-1000 for the same weight and take up way more space on your barbell. The only reason to buy bumpers is if you’re doing Olympic lifts and dropping weights from overhead. If you’re primarily doing powerlifting movements, iron saves you $200-400 while being more compact.
That said, if you skipped the horse stall mats, bumpers become necessary for floor protection. I wouldn’t deadlift with iron plates on bare concrete. The impact would crack your floor eventually, and the noise would be unbearable.
Pro tip: buy spring clips instead of those cheap spin-lock collars. I use REP’s spring clips, and they’re faster and more secure. The $15 investment saves you 30 seconds per plate change, which adds up to hours over a year of training.
14. Install Dimmer Switches for Adaptable Lighting Moods

This is a newer trend I picked up from commercial gyms, and it’s surprisingly effective. I added dimmer switches to my LED shop lights so I can run full bright (10,000 lumens) during heavy lifting sessions and dim down to 4,000 lumens for yoga or stretching.
The mood adaptability cuts perceived fatigue by about 15% based on my completely unscientific personal experience. Bright lights signal “work mode” to your brain, while dimmer lighting helps with recovery and cool-down activities. It mimics how high-end gyms use lighting to create different zones for different training styles.
Installation is simple if you’re even slightly handy. I replaced my standard light switches with dimmer switches from Lutron for about $30 each. Make sure you buy dimmers rated for LED lights specifically, as older dimmers designed for incandescent bulbs cause LEDs to flicker or buzz.
I honestly didn’t expect this to make much difference, but I find myself using the dimmer function almost daily. It’s especially nice for early morning workouts when full brightness feels aggressive before coffee kicks in.
15. Check Bedroom Proximity and Add Acoustic Underlayment

I made this mistake in my first basement gym. I set up directly below the master bedroom and didn’t realize how much noise transfers through floors until my wife threatened to hide my barbell. Deadlift thuds travel through joists like nobody’s business.
If your gym sits below bedrooms, add 1/2-inch acoustic rubber underlay beneath your horse stall mats. This drops noise transmission by about 50% and costs roughly $2 per square foot. I used Acoustical Solutions’ rubber underlayment, and it made enough difference that I’m allowed to train before 7 AM again.
The physics are simple: concrete transmits vibration efficiently, and standard rubber mats only absorb so much. The underlayment creates a second barrier that prevents impact from reaching floor joists where it amplifies and travels to rooms above.
Pro tip: if you’re planning a basement gym and have flexibility in location, choose a spot under living spaces instead of bedrooms. Nobody cares about deadlift noise at 3 PM, but everyone cares at 6 AM. I learned this the hard way and ended up moving my entire setup to the other end of the basement six months in.
Look, dark basements home gym setup ideas don’t require perfection. Start with lighting and flooring since those make the biggest immediate impact. Add equipment gradually as your budget allows, and focus on pieces that serve multiple purposes.
I’ve trained in my basement gym for three years now, and I genuinely prefer it to commercial gyms. No waiting for equipment, no cleaning up other people’s sweat, and no commute time eating into my training window. The initial setup took effort and money, but it pays dividends every single workout.
Save this article or pin it for when you’re ready to tackle your own basement transformation. Trust me, six months from now you’ll be wondering why you didn’t do this sooner.

FITPLAM Adjustable dumbbell set
A dependable everyday pick — FITPLAM Adjustable dumbbell set pulls in 12 ratings at 4.5 stars. Not flashy, just solid.
Frequently Asked Questions
How much lighting do I need for a dark basement gym?
Target 10,000 lumens total for a 400 sq ft space using LED shop lights at 5,000-6,500K color temperature. Mount linkable fixtures directly to joists for even coverage. Dim lighting kills motivation and makes it harder to check your form during lifts.
What’s the best flooring for a basement home gym?
I recommend 3/4-inch thick horse stall mats from Tractor Supply at around $40 each. They’re cheaper than gym-specific mats, absorb weight drops better than foam tiles, and significantly reduce noise transmission to upper floors while protecting your concrete.
Can I set up a gym in a basement with low ceilings?
Absolutely. Choose a 72-inch power rack like the Hydra from Bells of Steel specifically designed for basements under 8 feet. Standard 85-inch racks force you to modify movements or risk ceiling damage, which defeats the purpose of having a home gym.
How do I prevent rust on equipment in my basement gym?
Run a dehumidifier continuously to keep humidity below 50%. Ventilation alone isn’t enough in basements. I learned this the hard way when my first barbell developed surface rust after just three months. Consistent dehumidification protects your investment long-term.