What’s Inside
- Invest in Versatile Adjustable Dumbbells for Progressive Overload
- Master Resistance Band Rows for Muscle Activation
- Prioritize Eccentric Training During Your Back Workout At Home
- Utilize a Foam Roller for Targeted Recovery and Mobility
- Strengthen Your Grip with Dead Hangs for Improved Pulling Power
- Build a Towel Row Setup for Heavy Horizontal Pulling
- Use Water Jugs for High-Rep Finisher Sets
- Track Your Back Workout At Home with a Simple Logbook
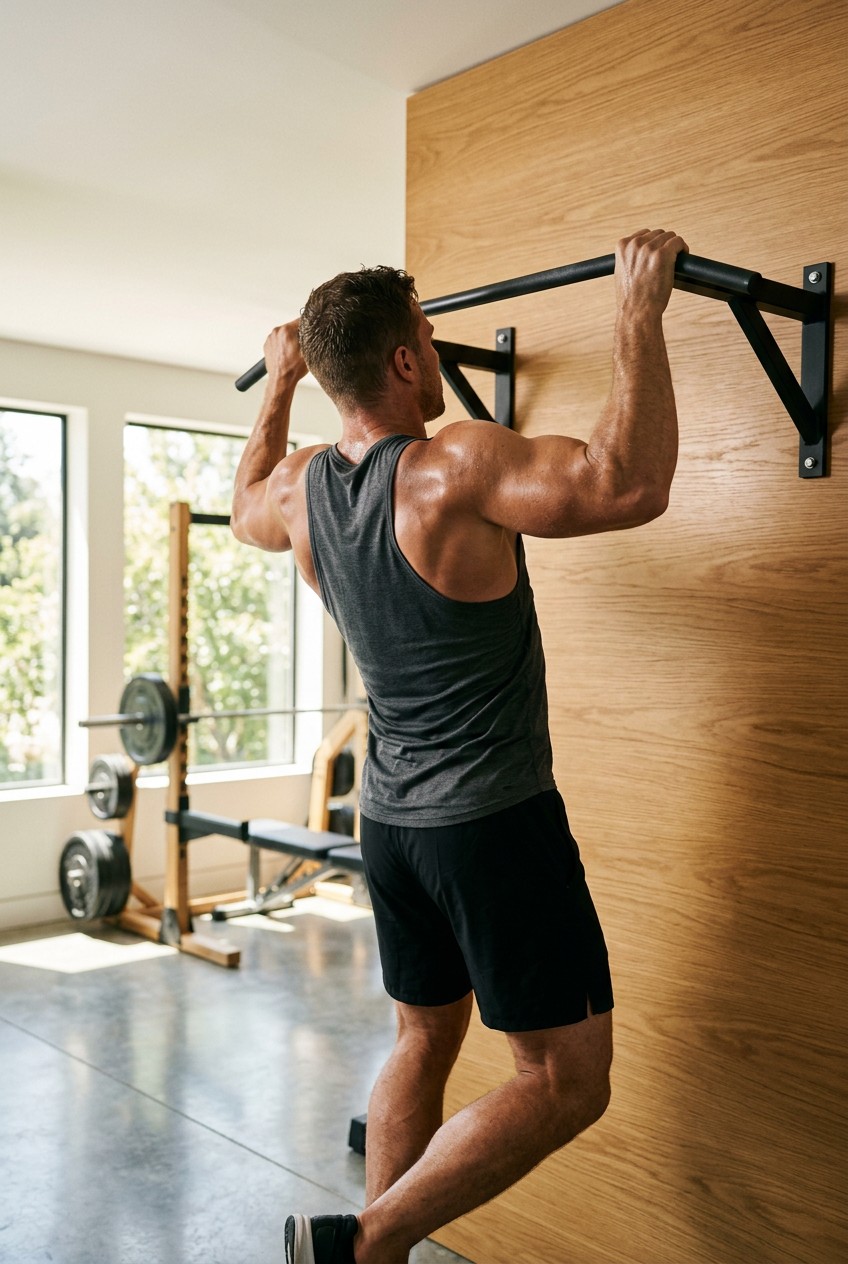
I was lying flat on my back on my scratchy living room rug last Tuesday, staring at a dented metal pull-up bar that had just violently detached from my doorframe. I was trying to execute a set of wide-grip pull-ups, completely ignoring the weight limit of the cheap plastic frame. That miserable, loud crash was my wake-up call that my back workout at home needed a serious reality check. I’m Ryan Brooks, and I’ve spent the last six years trying to build a massive back without stepping foot in a commercial gym. Honestly, most people get this completely wrong. They buy cheap junk, swing their arms wildly, and wonder why their lats are flat. It’s frustrating. I used to wander around Target, grabbing those flimsy $9.99 plastic resistance tubes, thinking they’d magically give me a v-taper. Spoiler alert. They snapped and whipped me right in the neck. (Learned that the hard way.) Building real pulling power in your living room requires specific gear and a refusal to do junk volume. You can’t just fake your way through it. Let’s fix your routine right now.
1. Invest in Versatile Adjustable Dumbbells for Progressive Overload

If you want a thick upper back, you can’t just do bodyweight rows forever. I personally swear by investing in heavy adjustable dumbbells. Last month, I was walking down the massive, concrete aisles at Costco, staring at a rack of fixed hex dumbbells. I almost bought a pair of 40-pounders for $45.00. That was a mistake I’ve made before. Fixed weights take up too much floor space. Your living room isn’t a warehouse. Instead, you need something compact that grows with you. I highly recommend the NordicTrack 55 lb Select-a-Weight Dumbbells. They cost exactly $399.00 for the pair. The NordicTrack system uses a smooth sliding selector. It doesn’t jam up like older dial systems. If you’re stronger, get the PowerBlock Pro 100 base set for $539.00. I’ve got the PowerBlocks sitting on the black rubber mats in my office right now. The cold, squared-off metal plates clank together with a heavy, satisfying thud when you pull a bent-over row. You slide the magnetic pin, hear a sharp click, and you’re locked in. A massive mistake people make is buying weights that are way too light. You need heavy loads for compound movements. Your lats are huge muscles. They won’t grow if you’re pulling a 15-pound pink dumbbell for fifty reps. The heavy adjustable sets let you start with 10 lbs for warm-up reverse flyes, then instantly jump to 55 lbs for heavy Kroc rows. The grip on the NordicTrack is knurled steel. It bites into your calluses just enough to feel secure when your palms are dripping with sweat. Skip the cheap plastic sand-filled weights. They leak gritty sand all over your hardwood floors. Trust me on that one. It’s an absolute nightmare to vacuum up.
2. Master Resistance Band Rows for Muscle Activation

You aren’t going to build a wide back if you can’t actually feel your lats working. I tried this wrong for months before figuring it out. I used to just heave weights up and down, feeling the burn entirely in my biceps and forearms. My back was completely numb to the movement. That’s why you need to master resistance band bent-over rows to force muscle activation. I use a heavy-duty 41-inch loop band from Mirafit. The exact one I use is the orange 40-80 lb resistance band, which runs about $24.99 online. I actually bought a cheap knockoff brand at Walmart a few years ago. It smelled like toxic tires and snapped after two weeks, leaving a red welt across my chest. Don’t do that. Stick to quality layered latex. To do this right, stand on the center of the band with your feet exactly 12 inches apart. You can also loop the band around a heavy sofa leg if standing on it feels awkward. Just make sure the sofa is heavy enough. Grab the loops. Pull the thick rubber toward your belly button. The tension increases aggressively at the top of the movement. You have to actively squeeze your shoulder blades together like you’re crushing a walnut between them. The rubber vibrates slightly as it stretches to its limit. This constant tension is incredible for waking up dormant rhomboids and traps. It’s a low-impact exercise, which is perfect if your lower back is feeling trashed from heavy deadlifts. I do 3 sets of 20 reps of these before I even touch a dumbbell. It forces blood into the lats. You’ll feel a deep, burning pump right under your armpits. If you aren’t doing this activation work, you’re leaving gains on the table. You might also like: 15 Brilliant Dark Basements Home Gym Setup Ideas Worth Trying This Year
3. Prioritize Eccentric Training During Your Back Workout At Home

Let’s talk about the lowering phase of your lifts. A common mistake I see constantly is guys dropping the weight like it’s on fire. They pull a heavy dumbbell up, then let gravity slam it back down. You’re cutting your muscle growth in half. To get the most out of your back workout at home, you have to prioritize eccentric training. That means slowing down the negative portion of the rep. I learned this the hard way last winter. I was stuck at doing exactly six pull-ups. I couldn’t break the plateau. Then I started doing 5-second eccentric pull-ups. I’d jump to the top of the bar, then lower my body agonizingly slowly. Three seconds in, my lats would start shaking violently. Your forearms will scream for mercy. The lactic acid build-up is intense. By five seconds, my grip was slipping, and my muscles felt like they were ripping apart. It creates insane micro-damage to the muscle fibers. The soreness the next day was brutal. I remember walking into Whole Foods the morning after an eccentric back session. I reached up to grab a $4.99 bottle of Harmless Harvest coconut water from the top shelf. My lats cramped so hard I nearly dropped the glass bottle on the tile floor. That’s the adaptive response you want. Apply this to your dumbbell rows, too. Pull the weight up in one second. Lower it for a full four seconds. Exhale sharply on the way up, and inhale slowly as you lower the weight. The eccentric phase builds serious pulling power. I highly recommend using a timer app on your phone to keep yourself honest. When you’re tired, a four-second negative usually turns into a one-second drop. Don’t cheat yourself. The pain of the slow negative is exactly what forces the muscle to adapt and grow thicker. You might also like: 15 Stunning Room Home Workout Ideas That Make a Real Difference

NICEPEOPLE Adjustable Weight Bench for Home Gym
Honestly, NICEPEOPLE Adjustable Weight Bench for Home Gym surprised me — sturdier than it looks in the photos, and over 32 buyers gave it 4.5 stars.
4. Utilize a Foam Roller for Targeted Recovery and Mobility

You can’t train hard if your back is locked up like a rusty hinge. I used to ignore recovery completely. I thought stretching was a waste of time. Then I woke up one morning with a knot under my left shoulder blade that felt like a hardened golf ball. I couldn’t even turn my head to check my blind spot while driving. You have to dedicate 5 to 10 minutes post-workout to foam rolling. I use a specific 10cm (4-inch) diameter foam roller. The TriggerPoint GRID Foam Roller is the absolute best on the market. It costs exactly $34.99. I bought a cheap, smooth white foam roller from Sprouts once for $12.99. It squished flat like a stale marshmallow within a single week. The TriggerPoint has a rigid hollow plastic core wrapped in textured EVA foam. When you lay on it, the firm ridges dig directly into your tight fascia. Target the teres major and the lower traps specifically. They get incredibly stiff from sitting at a desk all day. It hurts. It’s a good kind of pain, but it definitely makes you grit your teeth. Lay with the roller under your upper back. Cross your arms over your chest to open up your shoulder blades. Slowly roll horizontally below your neck down to your mid-back. You’ll hear a series of loud cracks and pops as your thoracic spine releases. It sounds like heavy bubble wrap popping. This practice relieves tension and drastically increases your range of motion for your next pulling session. After a heavy back day, I also take a hot bath with 2 cups of Dr. Teal’s Epsom Salt. I grab the 3 lb bag for $6.88 at my local grocery store. The eucalyptus smell fills the bathroom and clears your sinuses. The combination of the rigid foam roller and the hot magnesium soak keeps your lats pliable. You might also like: 20 Gorgeous Easy Home Workout Ideas That Actually Work
5. Strengthen Your Grip with Dead Hangs for Improved Pulling Power

Your back is only as strong as your hands. If your grip fails before your lats do, you won’t stimulate the back muscles enough to grow. This is a massive bottleneck for most people. I used to strap my hands onto the bar with lifting hooks for every single set. My back got stronger, but my forearms stayed tiny, and my raw grip was pathetic. You need to start doing dead hangs. Find a sturdy pull-up bar. The Iron Gym Total Upper Body Workout Bar ($29.99) works great if your doorframe is actually built correctly. Grab the bar with a double overhand grip, let your feet hang off the floor, and just hold on. Aim for 60 seconds. Around the 30-second mark, your forearms will start burning. By 45 seconds, the rough knurling on the bar will feel like it’s slicing into the calluses on your palms. Your pinky fingers will start uncurling involuntarily. You have to fight it. To keep my hands from slipping, I use FrictionLabs Unicorn Dung chunk chalk. A 5 oz bag costs $19.99. Rub the chalk deep into the creases of your fingers. Clap your hands once to remove the excess dust. White chalk dust floats in the air and keeps your palms bone dry. Sweaty hands are the absolute enemy of a good dead hang. I made the mistake of trying a max dead hang in my garage during July without chalk. I slipped off the bar and landed flat on my tailbone. It was embarrassing and incredibly painful. Chalk up. Your hands will get wrecked at first. I actually have to buy O’Keeffe’s Working Hands cream. It’s $8.49 for a 3.4 oz jar at Kroger. I rub a dime-sized amount into my palms every night before bed to keep the calluses from tearing open. Strong hands equal a massive back.
6. Build a Towel Row Setup for Heavy Horizontal Pulling

If you don’t own dumbbells yet, you can still get a massive pump using household items. But you have to do it right. I tried the whole rowing with a broomstick between two chairs thing. It’s a disaster. The chairs wobble, the broomstick bends, and you’re one slip away from a dental emergency. Instead, I use a heavy-duty towel row setup. You need a thick, durable towel. I specifically use a Mainstays oversized bath towel. I bought it for $3.98 at Walmart. Don’t use an old, frayed towel. I tried this last year with a worn-out beach towel. I looped it around a heavy pole in my basement, leaned back with all my weight, and the towel ripped clean in half. I flew backward and smashed my elbow into the concrete floor. My arm was bruised for three weeks. Take your sturdy bath towel and tie a thick knot in one end. Open a heavy solid wood door in your house. Make sure the door opens away from you. If it opens toward you, you’ll rip the door right out of the latch. Toss the knot over the top of the door and close it tightly. Give it a hard yank to make sure the knot is wedged securely against the doorframe. You’ll hear the door hinges creak slightly. Grab the hanging fabric with both hands. Plant your feet near the base of the door and lean back until your arms are fully extended. The rough terry cloth texture will dig into your hands. Pull your chest to the door, driving your elbows straight back. Squeeze your lats hard at the top. The beauty of this is that you can adjust the difficulty instantly. Move your feet closer to the door to make it heavier. Move them back to make it lighter. It’s a brutal bodyweight row.
FLYBIRD WB5 Weight Bench
FLYBIRD WB5 Weight Bench has been one of the most consistently praised picks in this category. 259 reviewers averaged 4.5/5.
7. Use Water Jugs for High-Rep Finisher Sets

Sometimes you need to completely exhaust the muscle at the end of a workout. When my adjustable dumbbells feel too heavy for high-rep burnout sets, I switch to water jugs. It sounds incredibly basic, but the mechanics of it are actually superior for stabilizer muscles. I buy two 1-gallon jugs of Crystal Geyser Alpine Spring Water. They cost exactly $1.25 each at Trader Joe’s. A gallon of water weighs exactly 8.34 pounds. It’s not a massive amount of weight, but it’s perfect for sets of 30 to 40 reps of bent-over reverse flyes. You can even add a handful of sand into the jugs if you need to bump the weight up a few more pounds. The secret is that the jugs aren’t completely full once you take a sip. The water sloshes back and forth inside the thin plastic container. When you raise your arms out to the sides, that shifting water creates dynamic instability. Your rear delts and rhomboids have to fire in overdrive to keep the jug steady. The smooth plastic handle also forces you to grip tightly. I used to just do endless push-ups to finish my workouts, completely neglecting my posterior chain. My shoulders rolled forward, and my posture was terrible. Adding these high-rep water jug flyes fixed my posture in a matter of months. Bend over until your torso is almost parallel to the floor. Keep a slight bend in your elbows. Raise the jugs out to the sides until your arms are parallel to the ground. You’ll hear the water splashing aggressively against the plastic. The paper labels will probably start peeling off from your sweaty hands. The burn sets in around rep 15. Push through it. By rep 30, your upper back will feel like it’s on fire. It’s the cheapest, most effective finisher you can do.
8. Track Your Back Workout At Home with a Simple Logbook

You aren’t going to build a strong back if you just guess what weights you used last week. Progressive overload requires accurate data. I used to track my workouts on my phone. I’d open the notes app, type in my sets, and then immediately get distracted by a text message. Next thing I knew, I’d spent ten minutes scrolling Instagram while my muscles cooled down. It completely ruined my intensity. Now, I strictly use a physical notebook to track my back workout at home. I use a classic Moleskine Cahier Journal with grid paper. A 3-pack costs $14.50. I bought my current batch at Target in the office supply aisle. There’s something incredibly satisfying about writing down your numbers with a real pen. I use a Pilot G2 07 black gel pen (it’s $5.49 for a 2-pack). The ink glides smoothly over the thick paper. I write the date, the exercise, the exact weight, and the reps. I even track my rest periods in the margins. If I rested 90 seconds last week, I try to keep it exactly the same. The sound of flipping the heavy paper pages between sets keeps me focused. If I hit 55 lbs for 10 reps on dumbbell rows this week, I look at that page next week and know I need to hit 11 reps. It removes all the guesswork. A major mistake beginners make is training by feel. They pick up whatever weight feels okay that day. That’s a one-way ticket to stagnation. Your body adapts to the stress you put on it. If you don’t force it to do more work over time, it won’t grow. The logbook holds you accountable. When you flip back through the pages and see the ink stains and sweat drops on the paper, you see your actual progress. Leave your phone in the other room. (Took me years to figure out that little trick.)
Building an impressive back doesn’t require a $50 monthly gym membership or massive cable machines. You just need the right tools, a heavy dose of intensity, and the discipline to execute the movements correctly. I’ve built more muscle in my living room using these exact methods than I ever did wandering around a crowded commercial gym waiting for a lat pulldown machine. Grab those adjustable dumbbells, secure your resistance bands, and stop dropping the weight on the eccentric phase. Your lats will thank you. Don’t let a lack of equipment be your excuse anymore. You have everything you need right in your house. If you found this guide helpful, make sure to pin this article to your fitness boards on Pinterest and save it for your next pulling session. Let’s get to work.
Frequently Asked Questions
Can I build back muscle without pull-ups?
Absolutely. While pull-ups are great, heavy dumbbell rows, resistance band pulls, and towel rows can fully stimulate your lats and rhomboids if you apply progressive overload and focus on the eccentric phase of the lift.
How heavy should my dumbbells be for a back workout at home?
Your back muscles are incredibly strong. You’ll quickly outgrow light weights. Invest in adjustable dumbbells that go up to at least 55 lbs per hand, allowing you to progress on heavy compound movements like Kroc rows.
Are resistance bands effective for building lats?
Yes, heavy-duty loop bands provide constant tension that is perfect for muscle activation. They force you to squeeze your shoulder blades together, which helps wake up dormant back muscles before you move on to heavier free weights.
How often should I train my back at home?
For optimal muscle growth, hitting your back two times per week is ideal. Make sure to leave 48 to 72 hours of rest between sessions, and use a rigid foam roller to relieve tension in your upper back on recovery days.