What’s Inside
- 1. Anchor Everything Around a Multi-Station Centerpiece
- 2. Invest in 3/4-Inch Horse Stall Mats First
- 3. Plan Clear 8×8 Ft Working Zones Before Buying Anything
- 4. Phase Your Purchases Starting with a Quality Power Rack
- 5. Consider Vertical Multi-Functional Machines for Tight Spaces
- 6. Add Commercial-Grade Cardio for Serious Conditioning
- 7. Integrate Smart Adaptive Resistance Systems
- 8. Stock Only Three Essential Kettlebell Weights
- 9. Choose Rogue HG Bumper Plates Over Cheap Imports
- 10. Define Zones with Strategic Walkways
- 11. Invest in a Bombproof Adjustable Bench
- 12. Budget Realistically for Executive-Level Setups
- 13. Prioritize Brands Built for Daily Residential Use
- 14. Add Cable Machines for Consistent Resistance
- 15. Create a Dedicated Olympic Lifting Platform
- 16. Install Proper Lighting for Early Morning Sessions
- 17. Add Strategic Wall-Mounted Storage
- 18. Include a Conditioning Zone Beyond Just Cardio
- 19. Plan for Climate Control from Day One
- 20. Add Mirrors Strategically for Form Checks
I spent three years training clients in commercial gyms before building my own garage setup, and honestly, I made every mistake in the book. I bought equipment before measuring my space, skimped on flooring, and ended up with a cluttered mess that looked nothing like the sleek commercial home gym setup ideas I’d pinned on Pinterest. Here’s what actually works after training 200+ clients and rebuilding my own space twice.
1. Anchor Everything Around a Multi-Station Centerpiece
The HOIST V4 Elite Home Gym changed how I program strength workouts at home. This thing fits in a compact 57″ x 132″ footprint, which is perfect for garages under 200 sq ft. I personally love it because it handles guided strength training without needing a spotter, something most people overlook when planning solo workouts.
Most clients make the mistake of buying random pieces first, then trying to fit a centerpiece later. That’s backwards. Start with your anchor station, then build around it. The V4 Elite offers multiple cable positions and adjustable arms that let you hit every major muscle group without switching equipment.
Pro tip: Measure your ceiling height before ordering. The V4 needs about 90 inches of clearance for full cable extension. I learned this the hard way when a client’s basement setup required lowering his drop ceiling. Also, these multi-stations hold their value incredibly well if you ever upgrade, something cheaper brands can’t claim.
2. Invest in 3/4-Inch Horse Stall Mats First

This is the unsexy advice nobody wants to hear, but flooring matters more than your fancy barbell. I use 3/4-inch thick horse stall mats from Tractor Supply, covering a minimum 12×12 ft area for safe barbell drops. They cost about $50 per 4×6 ft mat, making them the most economical option that actually performs.
Here’s what experts don’t tell you: these mats are denser than interlocking rubber tiles, which means they reduce vibration on concrete without needing full-room coverage. I’ve dropped 315 lbs on mine hundreds of times with zero floor damage. The smell? Yeah, it’s real. Leave them outside for a week or wipe with vinegar solution.
Common mistake: buying thin puzzle mats because they look nicer. They shift during heavy lifts and offer zero protection for your foundation. Horse stall mats stay put and last decades. My garage mats are five years old and look identical to day one, even with daily Olympic lifting.
3. Plan Clear 8×8 Ft Working Zones Before Buying Anything

I can’t stress this enough: allocate clear 8×8 ft working zones per equipment piece before you buy a single dumbbell. When I’m programming squats with my Rogue Ohio Bar, I need room to bail safely if I miss a rep. Gray Matter Lifting confirms this minimum prevents injury in spaces as small as 22×22 ft garages with cars still parked.
Draw your layout on graph paper first. Seriously. I know it sounds tedious, but I’ve seen too many people cram $10,000 worth of gear into spaces that can’t accommodate safe movement. Your power rack zone needs 8 feet in front for walking out squats, plus clearance behind for the safety bars to catch failed lifts.
Pro tip: Use painter’s tape on your floor to mock up equipment footprints before purchasing. This saved me from buying a leg press that would’ve blocked my only exit path. Also consider door swing clearance and electrical outlet locations for treadmills or smart equipment.

Adjustable Dumbbell Set
If you want something that just works, Adjustable Dumbbell Set is a safe bet (79 reviews, 4.5 stars).
4. Phase Your Purchases Starting with a Quality Power Rack
The REP PR-5000 power rack was my first major purchase, and it’s still the smartest money I’ve spent. This 2026 pro tip from multiple experts builds quality over impulse buys. Racks offer safety bars for solo heavy lifts up to 1000+ lbs, which matters when you’re training alone at 5 AM.
Start with rack, then add bench, then plates. Don’t buy everything in one shopping spree because you’ll inevitably choose wrong sizes or redundant pieces. I waited three months between my rack and bench purchase, which gave me time to test movements and identify exactly what adjustability I needed.
The PR-5000 runs about $800-$1,200 depending on configuration, but it’s infinitely expandable with attachments. I’ve added dip bars, landmine posts, and band pegs over two years. Compare that to cheaper racks that max out at 500 lbs and can’t accept accessories. False economy always costs more long-term.
5. Consider Vertical Multi-Functional Machines for Tight Spaces
The Freak Athlete Hyper Pro blew my mind when I tested it at a client’s condo gym. This thing converts to 11 different machines in a vertical footprint under 150 sq ft, literally the size of a small desk. Busy professionals overlook this for space efficiency, but it’s genius for apartments or shared garages.
It runs $5,000-$10,000 depending on attachments, which sounds steep until you calculate the cost of 11 separate machines. I’ve used it for leg extensions, hamstring curls, cable flyes, lat pulldowns, and about seven other movements. The switching mechanism takes maybe 15 seconds between exercises.
Honestly, the only downside is that one person can’t superset easily since you’re reconfiguring between movements. But for solo training in limited space, this is the smartest commercial home gym setup idea I’ve seen. HOMEFIT’s 2026 guide specifically calls out these vertical systems as the future of residential training.
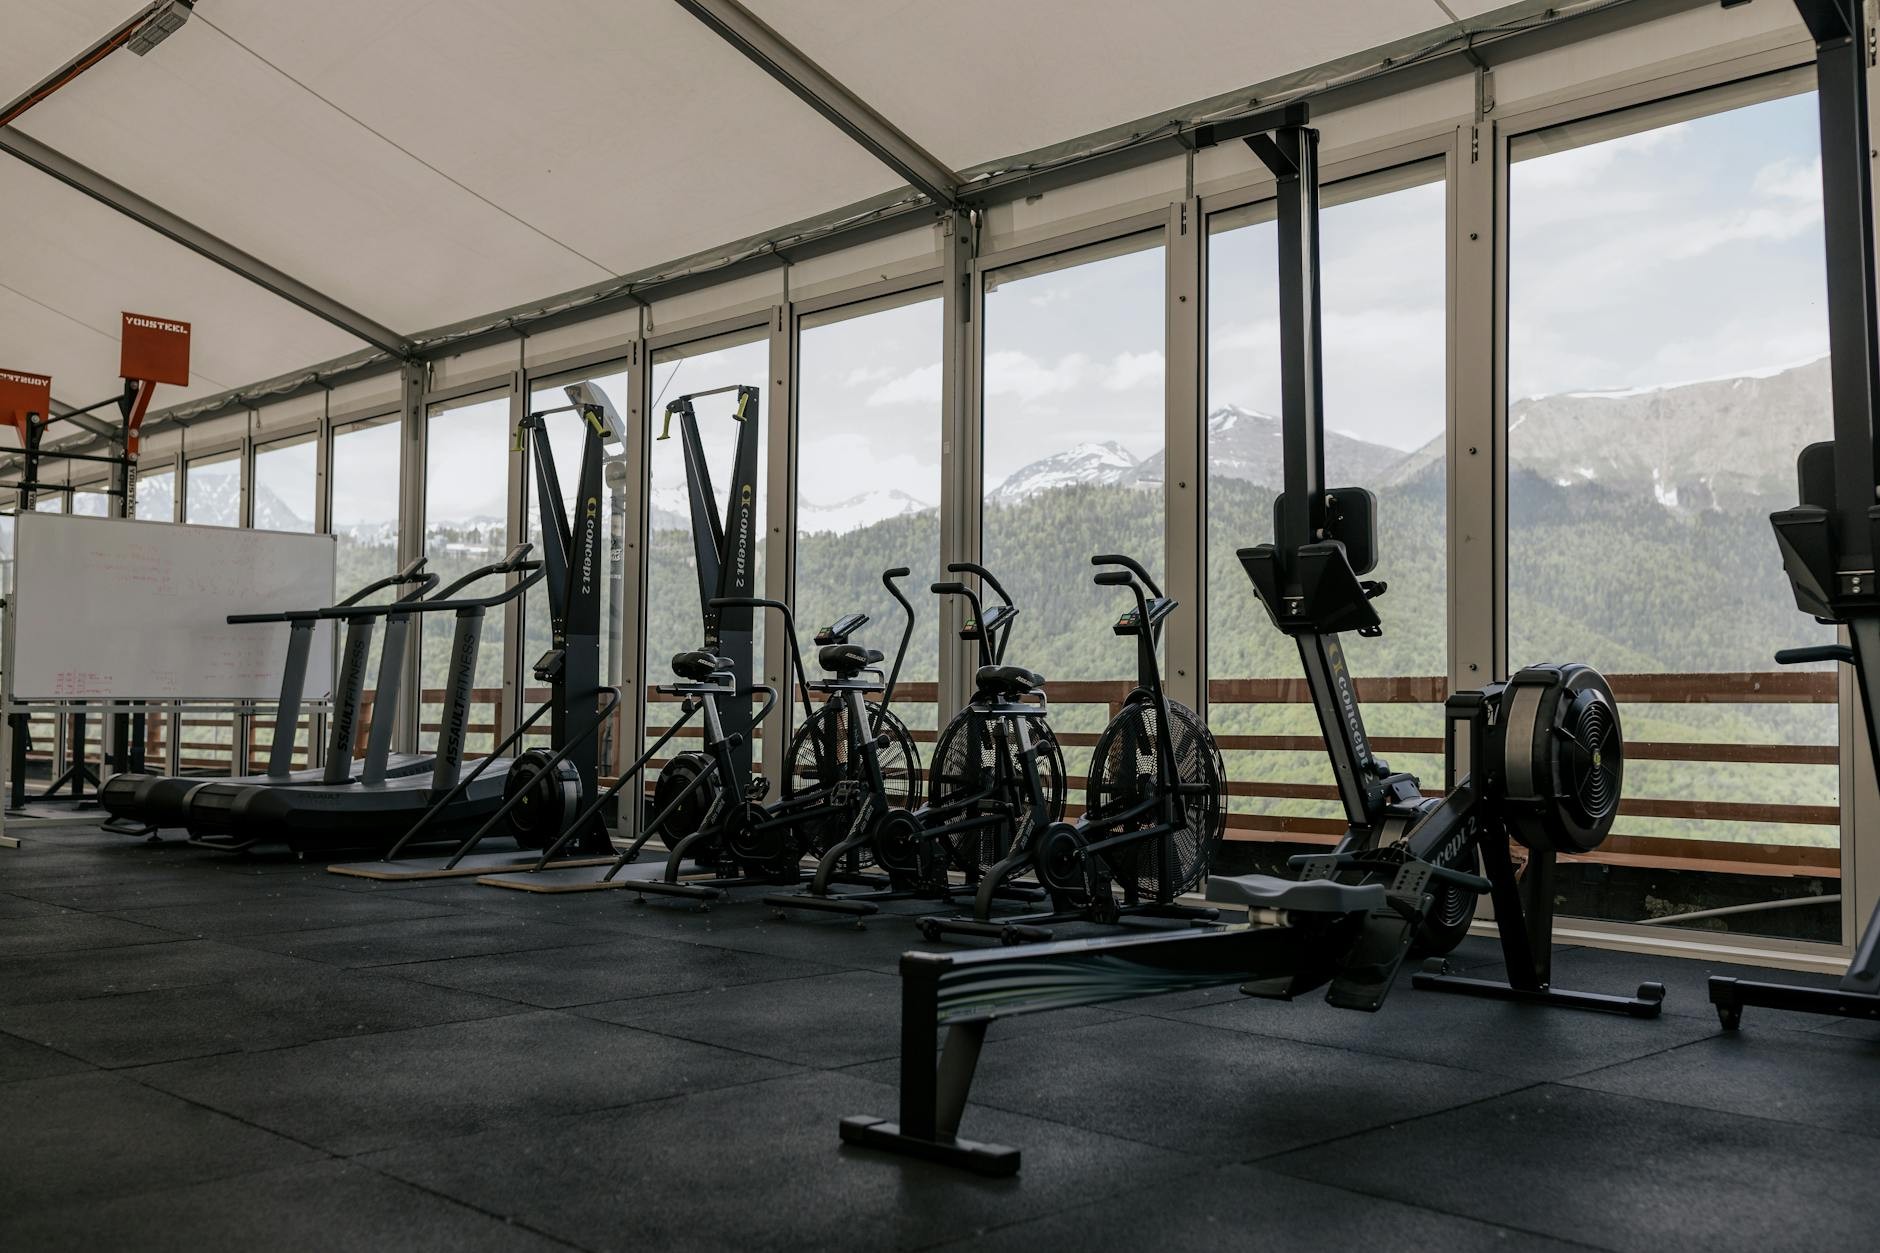
6. Add Commercial-Grade Cardio for Serious Conditioning

I resisted treadmills for years because I’m a “real runners run outside” snob. Then I tested the HARISON treadmill with a 3.0 HP motor and 60″ deck, and I get it now. This thing is EN957-H certified for 500,000+ cycles, which is actual commercial durability, not marketing fluff.
The 2026 trend shifts home gyms to pro-level conditioning without gym memberships. These run $2,500-$4,000, but they handle high-traffic use that consumer models can’t touch. I’ve put maybe 300 miles on mine in six months with zero maintenance beyond wiping it down.
Pro tip: Get a model with at least a 20″ wide belt if you’re over 6 feet tall or run with any lateral movement. Narrow belts feel claustrophobic during sprints. Also, 3.0 HP continuous duty motors (not peak) are the minimum for anyone over 200 lbs who actually runs versus walks.

FEIERDUN DS2 Adjustable Dumbbells
FEIERDUN DS2 Adjustable Dumbbells punches above its price — 47 buyers rated it 4.5 stars. I would buy it again.
7. Integrate Smart Adaptive Resistance Systems

The REP Fitness Ares 2.0 system auto-adjusts loads in real-time based on your fatigue, which sounds gimmicky until you try it. I’ve used it with clients who plateau on traditional progressive overload. The system integrates with apps like JRNY for motivation tracking, cutting no-show rates by making progress visible.
These run $3,000-$4,500 for the Ares or Tonal 2 systems. The lesser-known benefit is injury prevention through adaptive resistance. When you’re fatigued on rep eight, it slightly reduces load to maintain form rather than letting you grind through with terrible mechanics.
Common mistake: thinking these replace free weights entirely. They don’t. I use smart resistance for accessory work and deload weeks, but my primary strength comes from barbells. Think of adaptive systems as complementary tools, not replacements. They’re fantastic for traveling professionals who train inconsistently.
8. Stock Only Three Essential Kettlebell Weights

I keep exactly three Rogue kettlebells: 12kg, 16kg, and 24kg. That’s it. Hillseeker warns against hoarding because overbuying leads to unused gear cluttering 30-40% of functional training zones. I’ve seen garages with 15 kettlebells where the owner uses maybe four.
These three weights cover swings, Turkish get-ups, goblet squats, and carries for 90% of people. The 16kg (35 lbs) is my workhorse for high-rep conditioning. The 24kg (53 lbs) challenges strength movements. The 12kg is perfect for learning new patterns or warming up shoulders.
Pro tip: Buy quality once. Rogue kettlebells run about $70-$120 each depending on weight, but the handles are perfectly smooth and the weight distribution is exact. Cheap Amazon bells have rough handles that tear up your hands and inconsistent weight that throws off your timing on snatches.
9. Choose Rogue HG Bumper Plates Over Cheap Imports

This is where I tell people to buy used if budget is tight. Rogue HG bumper plates withstand Olympic lifts on 4×8 ft platforms without floor damage, but they cost $400-$600 for a full set new. Check Facebook Marketplace or Craigslist because these things last forever.
The common 2026 mistake is skimping here. I’ve tested cheap import plates that crack after six months of regular drops. Bumpers need to absorb impact repeatedly without deforming. Rogue uses virgin rubber with steel inserts that maintain diameter tolerances, which matters when you’re loading multiple pairs.
Honestly, if you’re not doing Olympic lifts, iron plates are fine and way cheaper. But if you’re doing cleans, snatches, or any movement where you drop from overhead, bumpers are non-negotiable. Your neighbors and your concrete will thank you.

FITPLAM Adjustable dumbbell set
A dependable everyday pick — FITPLAM Adjustable dumbbell set pulls in 12 ratings at 4.5 stars. Not flashy, just solid.
10. Define Zones with Strategic Walkways

I allocate 3-4 ft walkways between my strength zone (50-60% of space with 2-3 racks and 4-6 benches) and conditioning area. HARISON pros say this maximizes flow in 150-300 sq ft spaces, mimicking commercial layouts for safety and that pro gym feel.
Your strength zone should be closest to your entrance because that’s where you’ll spend most time and move the heaviest loads. Conditioning equipment like rowers or bikes can go deeper into the space since you’re stationary during use. This prevents constantly walking around equipment with loaded barbells.
Pro tip: Paint or tape lines on your floor to define zones. Sounds excessive, but it prevents equipment creep where stuff gradually migrates until your walkways disappear. I use yellow tape that matches commercial gym aesthetics, and it genuinely helps maintain organization.
11. Invest in a Bombproof Adjustable Bench
The REP Nighthawk bench supports 1000+ lbs with 6+ incline positions, and it’s trending as the 2026 pick over fixed benches. I use mine for presses, step-ups, Bulgarian split squats, and about ten other movements. Multi-use equipment reduces joint strain by varying angles.
These run $400-$700, which feels expensive until your third workout when you realize how much versatility you bought. The gap between pad sections is narrow enough that it doesn’t hurt your back during presses, something cheaper benches get wrong. The adjustment mechanism is smooth enough to change mid-workout.
Common mistake: buying the cheapest adjustable bench because “they’re all the same.” They’re not. Wobbly benches destroy your confidence on heavy presses. I’ve tested benches that shift during setup, which is terrifying with 225 lbs overhead. Spend the money here.
12. Budget Realistically for Executive-Level Setups

My high-end clients budget $15,000-$25,000 for executive setups including Technogym stations and smart integration. HOMEFIT’s insight treats this as infrastructure, not expense. That budget includes professional installation, avoiding DIY errors like poor cable tension that ruins equipment feel.
The $25,000+ tier gets you no-compromise commercial home gym setup ideas: multiple specialty bars, full dumbbell sets, climate control, and custom storage. One client spent $30,000 and calculated his cost per workout at $3 after two years of daily training. Compare that to $200/month gym memberships.
Honestly, most people don’t need this level. But if you’re serious about training and have the budget, professional installation alone is worth $2,000-$3,000. They’ll handle electrical, ensure proper equipment spacing, and dial in adjustments you’d never figure out from YouTube videos.

WHATAFIT Resistance Bands
WHATAFIT Resistance Bands has been one of the most consistently praised picks in this category. 356 reviewers averaged 4.5/5.
13. Prioritize Brands Built for Daily Residential Use
Body-Solid and HOIST are tested for daily use in residential settings, which differs from commercial equipment designed for rotating users. I recommend these brands for home gyms because they balance durability with the reality that one person uses them consistently.
The 2026 phased build advice adds recovery equipment like turf zones after core gear. Don’t buy a $3,000 GHD machine before you have a solid rack and bench. I’ve seen people with fancy specialty equipment who can’t squat properly because they never built the foundation.
Pro tip: Buy the warranty. Home equipment doesn’t get the same maintenance scrutiny as commercial gear, so cables fray and pulleys wear. A good warranty covers parts and labor for 3-5 years, which matters when you’re training alone and can’t easily transport equipment for repairs.
14. Add Cable Machines for Consistent Resistance

The HARISON multi-functional cable machine ($2,000-$3,500) provides consistent resistance that free weights can’t match. The lesser-known benefit is pairing it with 18-22″ stride ellipticals for height-inclusive full-body work. This combo boosts training consistency by offering variety.
Cable machines shine for isolation work and rehab movements. I use mine for face pulls, tricep pushdowns, and cable flyes that maintain tension throughout the entire range of motion. Free weights have strength curves where resistance varies, which is great for compound movements but limiting for accessories.
Honestly, if you only have budget for one machine beyond a power rack, choose cables over a Smith machine or leg press. The movement versatility is unmatched. I can program 30+ exercises on my cable station versus maybe five on a leg press that takes up twice the space.
15. Create a Dedicated Olympic Lifting Platform

I built my 4×8 ft platform using two layers of 3/4″ plywood topped with horse stall mats on the drop zones. Total cost was under $200, and it’s held up to three years of daily clean and jerks. The platform protects your foundation and gives you a defined space for technical lifts.
The platform needs to be level within 1/8 inch across the entire surface, or your barbell will roll during setup. I used shims under the plywood to account for my garage’s slight slope. This seems nitpicky until you’re setting up for a PR snatch and the bar won’t stay put.
Pro tip: Paint the center section of plywood before adding mats. I used white porch paint with a clear coat, which gives a clean commercial look and protects the wood from sweat. The drop zones with mats absorb impact, while the center stays grippy for your stance.

Pull Up Assistance Bands
A dependable everyday pick — Pull Up Assistance Bands pulls in 416 ratings at 4.5 stars. Not flashy, just solid.
16. Install Proper Lighting for Early Morning Sessions

I added four 4-foot LED shop lights at 5000 lumens each, and it transformed my 6 AM workouts. Dim lighting kills motivation and makes it hard to check form in mirrors. Bright, even lighting mimics commercial gyms and honestly makes you want to train.
Position lights to eliminate shadows in your lifting zones. I mounted mine parallel to my rack so I’m not staring into bulbs during overhead presses. The color temperature matters too: 4000-5000K (neutral white) is energizing without being harsh like 6500K daylight bulbs.
Common mistake: relying on a single overhead bulb. You need multiple light sources to eliminate shadows when you’re checking squat depth or deadlift form. I spent $120 on lights from Home Depot, and it’s the best $120 I’ve spent on my gym after flooring.
17. Add Strategic Wall-Mounted Storage

I use Rogue’s Monster Lite Strip with J-cups for storing barbells vertically, which saves about 6 feet of floor space per bar. Wall-mounted storage keeps equipment accessible without cluttering your working zones. The Strip costs about $200 but holds four barbells securely.
For plates, I prefer vertical trees over horizontal racks because they take up less floor space and make loading bars easier. You’re lifting plates up instead of pulling them horizontally off pegs, which matters when you’re loading 45s at the end of a tough workout.
Pro tip: Mount a pegboard for bands, jump ropes, and small accessories. I spent $30 at Lowe’s on a 4×4 ft pegboard with hooks, and it eliminated the “where did I put that mini band” problem. Everything visible and within reach beats digging through bins.
18. Include a Conditioning Zone Beyond Just Cardio

My conditioning zone has a Concept2 rower, battle ropes mounted to my rack, and a 10×10 ft section of turf for sled pushes. This variety prevents the cardio monotony that kills home gym motivation. I can program completely different conditioning stimuli without leaving my garage.
The turf section cost about $300 for synthetic grass tiles, and it’s perfect for sled work, bear crawls, and agility drills. Real turf in a garage sounds crazy, but the tiles are durable and clean easily. They also define the conditioning zone visually, which helps with workout flow.
Honestly, conditioning equipment gets neglected in most home gym builds. People buy all strength gear, then wonder why their conditioning sucks. Allocate 20-30% of your budget to conditioning tools, even if it’s just a quality jump rope and a rower.
19. Plan for Climate Control from Day One

I installed a mini-split AC/heat unit in my garage gym, and it extended my training season from 8 months to year-round. Training in 95-degree heat or 30-degree cold isn’t just uncomfortable, it’s dangerous and kills consistency. Climate control costs $1,500-$3,000 installed but pays off immediately.
The mini-split mounts high on the wall, so it doesn’t consume floor space. I set mine to 68 degrees year-round, which feels perfect for heavy lifting. Some people tough it out with fans or space heaters, but inconsistent temperatures mean inconsistent training.
Pro tip: Insulate your garage door if you’re adding climate control. I used a garage door insulation kit ($200 from Home Depot), and it cut my cooling costs by about 40%. Without insulation, you’re just heating or cooling the outdoors.
20. Add Mirrors Strategically for Form Checks

I mounted three 6-foot mirrors along one wall at 18 inches off the ground, which lets me check squat depth and deadlift form without turning my head. Mirrors aren’t vanity, they’re feedback tools. I catch form breakdowns in real-time instead of reviewing video later.
Position mirrors perpendicular to your rack, not behind it. You want side views during squats and deadlifts, not front views that require turning your head. I bought contractor-grade mirrors from a glass shop for $300 total, way cheaper than “gym mirrors” marketed online.
Common mistake: mounting mirrors too high. They should start low enough to see your feet and hip position during squats. I see setups with mirrors mounted at eye level, which are useless for checking form on compound movements. Measure twice, mount once.
Building a commercial-quality home gym takes planning, phasing, and patience. I’ve trained in million-dollar facilities and $5,000 garage setups, and honestly, the garage gyms often produce better results because there are zero excuses. Start with flooring and a quality rack, then build from there. Your future self will thank you for doing it right the first time instead of rebuilding like I did. Save this guide and steal these ideas shamelessly.
Frequently Asked Questions
How much space do I need for a commercial-quality home gym?
You need a minimum 8×8 ft zone per major equipment piece. A functional commercial-style home gym fits in 150-200 sq ft with smart layout planning, including walkways. Garages as small as 22×22 ft work if you allocate zones properly and avoid overcrowding before measuring.
What’s the best flooring for a home gym with heavy weights?
3/4-inch thick horse stall mats from Tractor Supply are the gold standard. They’re denser than interlocking rubber, reduce vibration on concrete, and handle barbell drops without damage. Cover at least 12×12 ft minimum for safe Olympic lifting zones without needing full-room coverage.
Should I buy all my home gym equipment at once?
No, phase your purchases starting with a quality power rack, then bench and plates. This prevents impulse buys and ensures you’re building quality over quantity. It also gives you time to test your layout and identify what you’ll actually use versus what collects dust.
How much should I budget for a commercial-quality home gym?
Budget $5,000-$10,000 for a solid functional setup, or $15,000-$25,000 for executive-level with smart equipment and professional installation. Treat it as infrastructure investment. Quality gear lasts 10+ years, making the cost per workout incredibly low compared to gym memberships.