What’s Inside
- Define Your Fitness Goals Before Buying Anything
- Measure Your Space and Check the Ceiling Height
- Install Heavy-Duty Flooring to Protect Your Joints
- Ditch the Bulky Rack for Adjustable Dumbbells
- Use Smart Systems for Small Spaces
- Try Virtual Reality Workouts When You Hate Cardio
- Pick the Right Kettlebell for Your Strength Level
- Hide Your Recovery Tools in a Converted Closet
I spent three months staring at a rusty, $45 kettlebell in my cramped apartment living room before I realized my setup was a total disaster. I bought it on a whim at Target, hoping for some quick home gym inspiration. Instead, it just gathered dust next to a pile of dirty laundry. I was doing it all wrong. The title of this guide says no equipment needed, but let’s be real. You don’t need a massive commercial cable machine or a bulky treadmill, but you do need a smart, minimal setup to get a good sweat in. I’m going to show you how to build a space that actually makes you want to work out. I’ve wasted hundreds of dollars on useless gear that just stubbed my toes and drained my wallet. We aren’t doing that here. I’m sharing the exact strategies I use to keep my space functional, clean, and highly effective without taking out a second mortgage.
1. Define Your Fitness Goals Before Buying Anything

I bought a $199.99 Marcy folding weight bench from Walmart last Tuesday because it was on sale. I don’t even bench press. I prefer kettlebell flows and mobility work. That bench just sat there, smelling like cheap vinyl and taking up valuable floor space. The vinyl squeaked every time I sat on it, and the metal frame rattled like a cheap tin can. Before you spend a single dime, write down exactly what you’re trying to do. Are you trying to get stronger? Do you want better cardio endurance? Experts from Onyx Fitness Equipment say buying gear without a plan is the fastest way to waste cash, and they’re right. I’ve seen clients buy bulky, $1,500 elliptical machines they never use, eventually turning them into expensive clothing racks for wet towels.
If your goal is flexibility, a $24.00 Manduka PROlite yoga mat from Sprouts is a better investment than a massive cable system. I’m begging you to stop impulse buying. Sit down with a notebook. Write down your actual routine. If you do HIIT three days a week, you need clear floor space and maybe some $14.99 SPRI resistance bands. You don’t need a squat rack. Let’s be honest about our habits. I wasted so much money trying to build a powerlifting gym in a space meant for yoga. If you’re focusing on mobility, you just need a clear floor and some cheap bands. Don’t overcomplicate it. I spent months thinking I needed a leg press machine to build my quads, but Bulgarian split squats with a pair of dumbbells work just as well. Keep it simple and targeted.
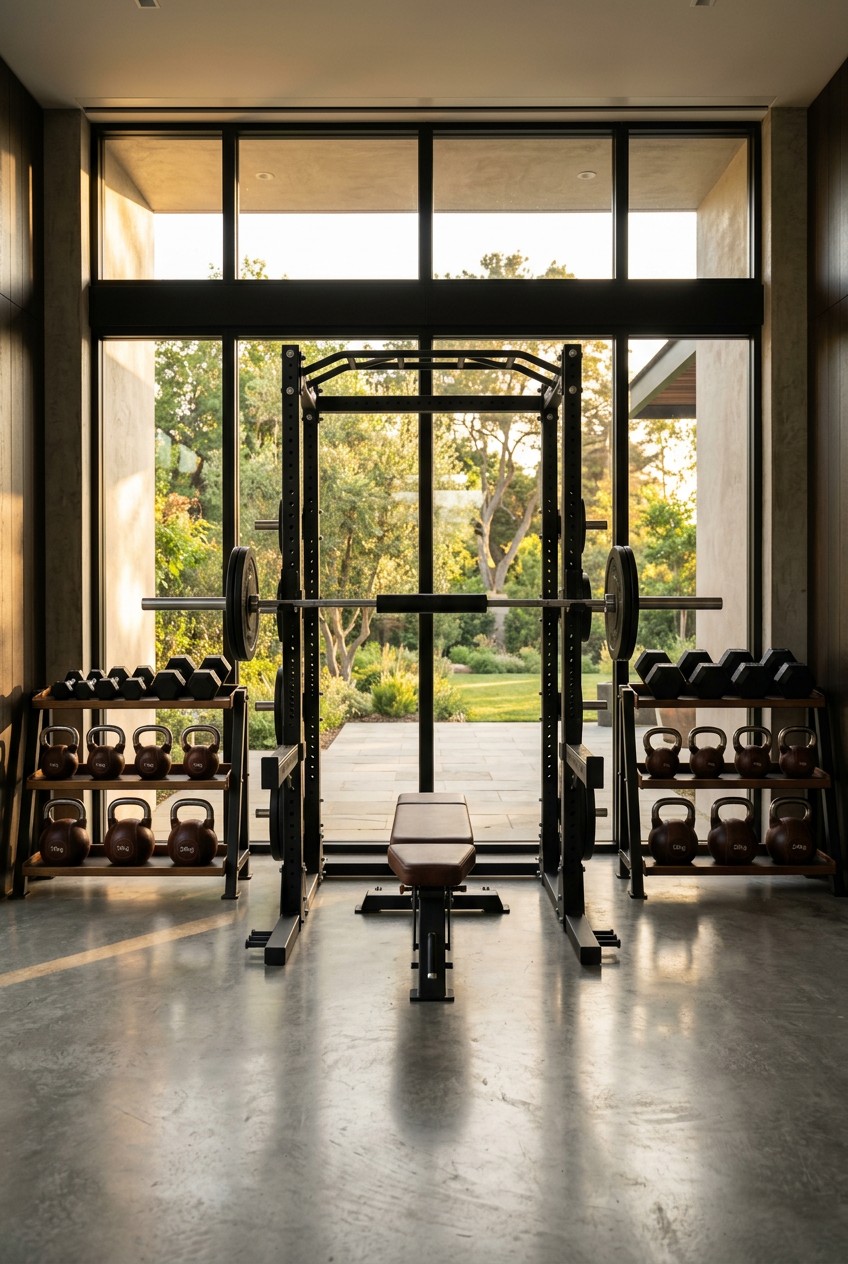
2. Measure Your Space and Check the Ceiling Height

I learned this the hard way last year when I ordered a 7-foot Titan Fitness T-2 Series Power Rack for $379.99. I dragged the 150-pound cardboard boxes into my basement, ripped them open, and started assembling the steel uprights. The metal felt cold and heavy in my hands, covered in that thin layer of manufacturing grease that smells like a mechanic’s shop. Then I hit the ceiling. Literally. My basement ceiling was only 6.5 feet high. I had to pay $85 in return shipping just because I didn’t measure. CSM Fitness, a brand with over two decades of industry experience, says ceiling height is the most critical measurement people forget. They recommend 43 to 108 square feet for a basic setup.
Grab a $5.99 Stanley tape measure from Home Depot. Measure the length, width, and height of your room. Write those numbers on a piece of masking tape and stick it to your wall. If you’re doing overhead presses with a 45-pound barbell and 25-pound bumper plates, you need clearance for your arms and the full diameter of the weight. I can’t tell you how many times I’ve scraped my knuckles on popcorn ceilings doing burpees in a cramped spare bedroom. It hurts. It ruins your drywall. Always account for the thickness of your flooring, too. If you add 3/4-inch rubber mats, you just lost almost an inch of vertical clearance. That matters when you’re doing pull-ups. I’ve bumped my head on the ceiling joists more times than I can count because I forgot to factor in the floor height. You can’t defy physics, so plan accordingly.
3. Install Heavy-Duty Flooring to Protect Your Joints

Skip those cheap, interlocking foam puzzle mats. They smell like a chemical factory and rip apart into tiny black crumbs the second you drop a weight on them. I tried them once. They slid all over my slick concrete garage floor, and I nearly twisted my ankle doing lateral lunges. The secret to real home gym results is agricultural flooring. I’m talking about 3/4-inch thick solid rubber horse stall mats from Tractor Supply. They usually cost about $1.70 to $2.30 per square foot. I floored my entire 200-square-foot garage for exactly $415.45 last month.
These mats are heavy. They weigh about 100 pounds each. Bring a friend to load them into your truck. They have a strong, pungent rubber smell for the first few weeks, like a tire shop on a hot summer day, so leave your garage door open to air them out. That smell is a definite negative. But they are indestructible. You can drop a 50-pound dumbbell directly on them, and your concrete subfloor won’t even notice. Plus, they give your joints a nice cushion when you’re doing jump squats. I’ve bought the $49.99 Gorilla Mats from Amazon before. They’re fine for yoga, but they can’t handle heavy lifting. Another quick tip on these mats: they expand and contract with the temperature. If you live in a climate with hot summers and cold winters, leave a tiny gap around the edges of the room. I laid mine flush against the drywall, and they buckled slightly in July when the garage got up to 90 degrees. You might also like: 20 Gorgeous Garage Home Gym Setup Ideas to Steal Right Now

Resistance Bands for Working Out
Resistance Bands for Working Out has been one of the most consistently praised picks in this category. 278 reviewers averaged 4.5/5.
4. Ditch the Bulky Rack for Adjustable Dumbbells

I used to have a massive A-frame rack holding six pairs of hex dumbbells. It took up a quarter of my spare bedroom and always collected a thick layer of dust on the bottom tiers. I constantly tripped over the 15-pounders. If you want a clean, minimalist setup, you need adjustable dumbbells. I personally swear by the Bowflex SelectTech 552s. They run about $429.00 on Amazon. They let you click from 5 to 52.5 pounds per hand in seconds. The clicking sound of the hard plastic dials locking into place is incredibly satisfying, like racking a heavy bolt. You might also like: 20 Beautiful Home Gym Setup Ideas That Changed Everything
If you’re on a tighter budget, the LifePro adjustable dumbbells cost around $179.99 and do the exact same job. You save so much floor space. The only negative is that they’re a bit longer than standard cast-iron dumbbells. This extra length feels slightly awkward during bicep curls or shoulder presses until you get used to the wider profile. I dropped one of my Bowflex weights on the concrete once, and the plastic dial chipped. They aren’t meant to be thrown around like solid iron hex weights. Just remember to keep them clean. The internal mechanisms can get jammed if you let chalk or dust build up inside the dials. I use a cheap can of compressed air from Target to blow out the gears once a month. It keeps the clicking mechanism smooth and prevents the plates from sticking together. For a small room, they are a necessity. You might also like: 15 Creative Workout Motivation Tips You Haven’t Thought Of
5. Use Smart Systems for Small Spaces

I was highly skeptical of digital weights. I like the cold, rough feel of knurled iron biting into my calluses. But a buddy of mine installed a Tonal 2 in his apartment living room, and I tried it out last Friday. I was humbled immediately. The Tonal 2 mounts directly to your wall and provides up to 250 pounds of digital resistance using electromagnetic engines. It costs a staggering $3,995.00, plus a monthly subscription. That price tag is a massive negative for most budgets. But the AI form correction is wild. The machine physically backed off the resistance smoothly and instantly when my left arm started shaking during a heavy overhead press.
If you can’t drill into your walls, the Speediance Gym Monster is a foldable functional trainer that costs around $2,699.00. It folds up to the size of a small bookshelf. I wouldn’t trade my free weights for them entirely. But if you live in a tiny condo and have the cash, this is amazing equipment. The smooth, silent pull of the digital cables feels completely different from a clunky metal weight stack scraping against guide rods. It’s eerily quiet. You can crank out a heavy chest day at 2 AM without waking up your neighbors. The installation process for these smart systems is usually handled by professionals, which is a relief. I watched the delivery guys mount my buddy’s Tonal, and they used heavy-duty lag bolts right into the studs. You can’t just hang these things on drywall anchors. They generate too much torque and will rip right out of the wall.
6. Try Virtual Reality Workouts When You Hate Cardio

I hate running on treadmills. Staring at a blank wall while jogging in place makes me want to scream. Last winter, I bought a Meta Quest 3 headset for $499.99 at Best Buy. I downloaded a VR fitness app called FitXR for $9.99 a month. I thought it would be a silly game. I was wrong. I spent 45 minutes shadowboxing virtual targets in a neon-lit digital arena, and I ended up drenched in sweat. The foam face pad on the headset got completely soaked with sweat, turning into a wet sponge. That is honestly pretty gross and a definite negative. You have to buy a $29.00 silicone cover to keep it sanitary.
But the science backs it up. VR lowers your rate of perceived exertion. Your brain is so distracted by the game that you don’t realize how hard your lungs are working. Platforms like FitXR offer immersive experiences in boxing, dance, and high-intensity interval training, turning a grueling cardio session into an arcade game. I use it twice a week now for cardio. It’s a fantastic alternative if you don’t have room for a massive rowing machine or spin bike. You just need a clear 6×6 foot square so you don’t accidentally punch your television. I almost shattered my TV screen throwing a wild left hook. The controllers also have wrist straps. Use them. I was doing a virtual tennis workout and my palms got so sweaty that the plastic controller slipped right out of my grip. It smashed into my coffee table and chipped the plastic housing. Always use the safety straps when you’re doing VR cardio.

ProsourceFit Pull Up Bar for Multi Use Fitness & Home Gym
ProsourceFit Pull Up Bar for Multi Use Fitness & Home Gym Exercise punches above its price — 185 buyers rated it 4.5 stars. I would buy it again.
7. Pick the Right Kettlebell for Your Strength Level

Most people buy a kettlebell that is way too light. I see it all the time with my personal training clients. They show up with a cute 5-pound vinyl-coated bell they bought at Kroger for $12.99, usually in some bright neon pink color. You can’t do a proper kettlebell swing with 5 pounds. It just floats in the air. You need gravity and momentum to engage your glutes and hamstrings. If you’re a beginner, men should start with a 16 kg (35 lbs) cast iron bell. Women should look at a 12 kg (26 lbs) bell. I recommend the Rogue Fitness powder-coated kettlebells. A 35-pounder costs exactly $65.00.
The powder coat gives you a gritty, chalk-like grip that won’t slip out of your hands when you’re dripping sweat during a twenty-minute EMOM workout. I once bought a cheap, smooth enamel kettlebell. It slipped out of my sweaty palm during a heavy Russian swing, flew across the room, and dented my drywall right down to the wooden stud. Never again. For ballistic movements like swings and snatches, you need a heavier weight to force your hips to do the work. If you’re doing Turkish get-ups or overhead squats, you can drop down to a lighter weight while you nail the form. But for swings, go heavy. If you’re serious about kettlebell training, eventually you’ll want a competition bell. They are all the exact same size regardless of weight, which keeps your form consistent. But for general home gym needs, standard cast iron is perfectly fine. Just avoid the plastic-coated ones at all costs. They feel terrible in your hands.
11. Hide Your Recovery Tools in a Converted Closet

I live in a three-bedroom house, and space is tight. I didn’t want my sweaty foam rollers and massage guns cluttering up the living room carpet. So, I took the doors off a small hallway coat closet and turned it into a dedicated recovery station. I bought a $29.99 high-density foam roller from Trojan Fitness. It’s incredibly firm and digs right into my tight IT bands, providing that painful but necessary release. I keep it on the bottom shelf next to my $299.00 Theragun Prime percussive massager. The massager is loud. It sounds exactly like a heavy-duty power drill running at full speed. But it saves my sore calves after a run.
I also bought a Merach Walking Pad for $199.99 on Amazon. It slides perfectly upright into the narrow gap next to the closet shelves. I used to leave my walking pad flat on the floor, and I tripped over the power cord twice in one week. Stashing it in the closet keeps the house looking normal. Just grab some $15.99 heavy-duty shelving brackets to hold your heavier kettlebells and Pvolve P.band resistance bands. I even bought some expensive 16 oz lavender epsom salts at Whole Foods last Tuesday and store them in a glass jar right here. It keeps the mess hidden. Don’t forget about air quality in your storage area. Sweaty knee sleeves and damp lifting belts will make a closed closet smell like a locker room very quickly. I threw a $9.99 Arm & Hammer moisture absorber box on the top shelf. It pulls the humidity out of the air and keeps my gear smelling relatively fresh.
Building a workout space doesn’t mean you have to buy a commercial cable tower. Start with the basics. A good mat, some adjustable weights, and a solid plan will get you further than a room full of expensive machines you don’t know how to use. I’ve wasted hundreds of dollars on gimmicks, so stick to the essentials I listed above. If you found this helpful, save this page or pin it to your fitness board so you can reference these exact products later. Now get off your phone and go get a sweat in.
Frequently Asked Questions
What is the best flooring for a home gym?
Skip the cheap foam puzzle mats. I highly recommend 3/4-inch thick horse stall mats from a farm supply store like Tractor Supply. They’re heavy, durable, and protect your concrete subfloor from dropped weights while providing excellent joint cushioning.
Do I need a squat rack for a home gym?
You don’t need a massive power rack if space is tight. If you want to lift heavy, consider a folding half rack that mounts to your wall. It swings out for squats and folds flat when you’re done, saving valuable floor space.
How much space do I need for a basic home gym?
You can get a great workout in a 6×6 foot area. Experts recommend between 43 to 108 square feet for a basic setup. Just make sure to measure your ceiling height carefully before buying any tall equipment or power racks.
Are adjustable dumbbells worth the money?
Absolutely. Buying a full rack of hex dumbbells takes up too much room and collects dust. Adjustable dumbbells let you switch weights instantly and replace an entire rack in the footprint of a single shoebox. They’re a space-saving necessity.