What’s Inside
- Grab Quality Resistance Bands for Better Body Weight Workouts
- Master the Hollow Body Hold for Core Dominance
- Install a Sturdy Doorframe Pull-up Bar
- Use Tempo Training to Maximize Body Weight Workouts
- Force Balance with Unilateral Training
- Prioritize Active Recovery and Mobility Drills
- Fuel Up with Strategic Protein Intake
- Track Everything with a Dedicated App
- Upgrade to Calisthenics Rings for Advanced Growth
- Add a Weighted Vest for Maximum Overload
Last Tuesday at Target, I completely threw out my lower back heaving a 40 lb bag of dry dog food into my cart. I stood under those harsh fluorescent lights, sweating through my grey cotton t-shirt, listening to the squeaky wheels of passing carts. I realized my fancy gym machine routine wasn’t translating to real life at all. That embarrassing moment proved why you need functional body weight workouts in your routine immediately. Body weight workouts aren’t just for beginners or people stuck in hotel rooms. They build raw, usable strength that actually protects your joints and spine. I spent years ignoring calisthenics because I thought I needed heavy iron plates to grow. I was wrong. My shoulders constantly clicked, my hips felt like rusty hinges, and my core was weak. I finally ditched the barbells for a few months to fix my foundation. I tried doing this wrong for months before figuring it out. I’d rush reps, ignore my breathing, and skip mobility entirely. Here’s the exact breakdown of how I structure my sessions now. I’ve included the specific gear, tempo tricks, and nutrition hacks I use to make it work. Let’s fix your routine.
1. Grab Quality Resistance Bands for Better Body Weight Workouts

If you think bands are just for physical therapy, you’re missing out. I used to buy those cheap, thin rubber strips that snap and whip your shins. The sharp sting of cheap rubber slapping my bare leg at 6 AM is a feeling I won’t ever forget. Trust me. Skip those completely. You need a set of thick, layered medical-grade latex loop bands. I swear by the Clench Fitness 41-Inch Loop Resistance Bands. A 5-band set costs exactly $64.99 online. The texture is thick and chalky, meaning they won’t slip out of sweaty hands during intense sets. I also keep a Theraband yellow band (1-6 lbs of resistance) and a red one (2-7 lbs) in my gym bag. A 5-foot strip of the yellow Theraband costs about $6.99 at Walmart. I use the heavy Clench bands for assisted pull-ups. I loop the thick green band over my bar, step my size 11 shoe into the loop, and let the rubber stretch take 20 lbs off my body weight. It’s the only way I finally nailed my strict pull-up form. For the lighter Therabands, I use them for glute activation. Tying a 2-foot piece around my knees and doing slow lateral walks fixed my knee pain during squats. Most people get this wrong. They rush the banded movements. Slow down. Feel the thick rubber fighting you on every single inch of the rep.
2. Master the Hollow Body Hold for Core Dominance

Forget standard crunches. Crunches just wreck your neck and do nothing for your deep core stability. The hollow body hold is where the real magic happens. I learned this the hard way after watching a Peloton class with Olivia Amato. She casually held this position while I was shaking like a leaf on my living room floor, salty sweat dripping into my eyes. The hollow hold targets your rectus abdominis, transverse abdominis, and obliques all at once. The setup is crucial. Lie flat on your back. Press your lower back violently into the floor. If I can slide a thin piece of paper under your lumbar spine, you’re doing it wrong. Lift your shoulders exactly 2 inches off the floor. Squeeze your legs together tight and extend them straight out. Hold that rigid position for 30-60 seconds. My biggest mistake early on was arching my lower back when I got tired. This shifted the tension to my hip flexors and caused a sharp pinching sensation in my groin. Don’t do this. Tuck your pelvis hard. I do these on a Liforme Yoga Mat. It costs $140 and is exactly 4.2mm thick. The polyurethane top layer has a sticky, grippy texture that keeps me from sliding around when my back gets soaked. I typically do 4 sets of 45-second holds before I even touch another exercise.
3. Install a Sturdy Doorframe Pull-up Bar

You can’t build a wide, thick back with push-ups alone. You need vertical pulling movements. I avoided pull-ups for years because I didn’t want to drill holes in my apartment walls and lose my security deposit. Then I found the Iron Age Pull-Up Bar. It costs $45.99 on Amazon and holds up to 440 pounds of dead weight. It fits doorways up to 36.22 inches wide and installs in about 15 seconds. No screws. No drills. Just thick carbon steel and dense foam grips. The foam smells slightly chemical when you first unbox it, but that odor fades after a day near an open window. Another great option is the Perfect Fitness Multi-Gym for $34.99. It supports up to 300 lbs and has wide, neutral, and narrow grip options. I prefer the neutral grip (palms facing each other) because it’s easier on my elbow joints. I used to flare my elbows out wide during standard pull-ups. That caused a horrible grinding, popping sound in my right shoulder socket. Bad idea. Keep your elbows tucked slightly forward. When I take the bar down, I place it on the floor to use as push-up handles. The elevated grip lets me drop my chest a full 3 inches lower, stretching the pectoral muscle fibers deeply. It’s a brutal, tearing burn. You might also like: 15 Clever Garage Home Workout Ideas That Are Totally Worth It

FLYBIRD WB2 Weight Bench
FLYBIRD WB2 Weight Bench has been one of the most consistently praised picks in this category. 215 reviewers averaged 4.5/5.
4. Use Tempo Training to Maximize Body Weight Workouts

When you don’t have heavy iron dumbbells, you have to manipulate time. Tempo training is how you force your muscles to grow without external load. I usually grab a cold 16 oz bottle of water from Kroger, set it next to my mat, and prepare for misery. The standard tempo I use is 3-1-X-1. That means a strict 3-second eccentric (lowering) phase, a 1-second pause at the bottom, an explosive concentric (pushing) phase, and a 1-second pause at the top. Let’s apply this to a standard push-up. You lower yourself slowly, counting one, two, three. Your chest should hover exactly 1 inch above the floor. Pause for one agonizing second. Push up as fast as possible. Pause at the top with your triceps fully locked out. I tried this wrong for months. I’d speed up the lowering phase because the muscular burn was too intense. The slow eccentric phase is what actually causes micro-tears in the muscle fibers. That’s exactly what you want for growth. A set of 10 push-ups done with this strict tempo will leave your chest feeling like it’s on fire. Your breathing will be heavy and ragged. Your arms will shake. It’s harder than knocking out 30 sloppy, fast push-ups. You might also like: 15 Beautiful Photoshoot Home Workout Ideas to Steal Right Now
5. Force Balance with Unilateral Training

Most guys have one leg significantly stronger than the other. My right leg used to dominate every single squat I did. I didn’t notice the imbalance until my left knee started aching constantly during morning jogs. Unilateral (single-limb) exercises are mandatory for fixing these hidden imbalances. The pistol squat is the absolute king of single-leg movements. It requires immense ankle mobility, core balance, and raw quad strength. I spent four weeks just holding onto a wooden doorframe, slowly lowering myself down on my right leg while keeping my left leg straight out in front of me. The first time I tried it without holding on, I tipped over backward and slammed my tailbone into the hard oak floor. It bruised for a week. Start with single-leg Romanian deadlifts instead. Plant your left foot flat. Hinge at your hips and extend your right leg straight back. Keep your back flat like a table. You’ll feel a deep, pulling stretch in your left hamstring. I usually hold a 10 lb bag of jasmine rice or a heavy plastic jug of laundry detergent for a little extra resistance. A common mistake is opening your hips to the side to cheat the balance. Keep your hips square to the floor. Slow, controlled reps are the only goal here. You might also like: 15 Brilliant Dark Basements Home Gym Setup Ideas Worth Trying This Year
6. Prioritize Active Recovery and Mobility Drills

Prehab is a massive trend, and for good reason. Waiting until you’re seriously injured to start stretching is a terrible strategy. I dedicate exactly 15 minutes every single night to active recovery. I usually do this on my living room rug while watching a basketball game. I use a TriggerPoint GRID Foam Roller. It’s 13 inches long, costs $34.99, and has a rigid, hollow plastic core wrapped in dense EVA foam. The foam has a specific grid pattern that mimics a massage therapist’s stiff fingers. It hurts in the best way. I roll out my upper back, listening to the satisfying pops and cracks of my thoracic spine decompressing. Then I move into cat-cow stretches. I get on all fours, drop my belly toward the floor, and look up. Then I round my back up toward the ceiling like an angry cat. I do 10 slow reps. Next, I do deep hip circles. I picked up this routine after a brutal leg day left me walking like a stiff zombie through Trader Joe’s. I couldn’t bend down to grab a bag of frozen broccoli from the bottom freezer shelf. Mobility drills lubricate your joints and flush out stagnant lactic acid. Skip this, and you’ll feel stiff, sluggish, and prone to muscle tears.
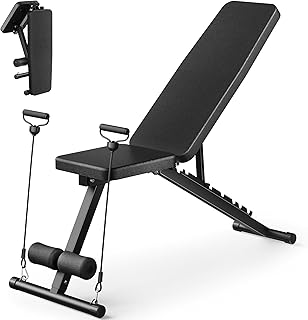
Adjustable Weight Bench for Home Gym
Honestly, Adjustable Weight Bench for Home Gym surprised me — sturdier than it looks in the photos, and over 517 buyers gave it 4.5 stars.
7. Fuel Up with Strategic Protein Intake

You can do endless push-ups, but if you aren’t eating enough protein, your muscles won’t rebuild. I aim for 1.6 to 2.2 grams of protein per kilogram of body weight. For me, that’s roughly 160 grams daily. I don’t mess around with overhyped supplements. I stick to the proven basics. Optimum Nutrition Gold Standard 100% Whey Protein is my go-to. A 2 lb tub in Double Rich Chocolate costs $44.99 at Whole Foods or Costco. The powder is fine and mixes perfectly without leaving those disgusting, chalky clumps at the bottom of my shaker bottle. I mix exactly 1 scoop (24g of protein) with 8 oz of cold, unsweetened almond milk within 45 minutes of finishing my workout. I used to skip post-workout shakes because I thought real food was always superior. But honestly, trying to choke down a dry, 6 oz baked chicken breast immediately after a grueling session is nauseating. The liquid whey digests fast and hits your bloodstream when your muscles are starving for amino acids. I also throw in 2 tablespoons of creamy peanut butter for healthy fats and extra calories. Skip the fat-free stuff. It tastes like wet cardboard.
8. Track Everything with a Dedicated App

If you aren’t logging your reps, you aren’t training. You’re just exercising blindly. I wasted three years of my life doing random sets of pull-ups and lunges without tracking a single number. I plateaued hard and got frustrated. Now, I log every single workout. I use the Strong app. The free version is decent, but I pay $29.99 a year for the premium tier. The interface has a sleek, dark mode background that doesn’t blind me when I check my phone in a dimly lit garage gym. It tracks total volume, personal records, and exact rest timers. It even gives a satisfying little haptic vibration when you finish a set. Another solid option is Jefit. The Elite plan costs $12.99 a month and has over 1,400 exercises in its library. I prefer Strong because it specifically lets me input my exact body weight for exercises like tricep dips. Last month, I noticed my dip reps dropped from 12 to 8. I checked the app and realized I had gained 4 lbs of body weight. The app calculated that my total volume pushed was actually higher, even with fewer reps. That data keeps you sane. Don’t rely on your memory. Your brain will lie to you about how many reps you did last week.
9. Upgrade to Calisthenics Rings for Advanced Growth

Once standard push-ups and dips get too easy, you need extreme instability. Calisthenics rings will humble you immediately. I bought a set of wooden rings from Fringe Sport for $49.00. They come with 15-foot heavy-duty nylon straps and thick metal cam buckles. The wood has a slightly rough, natural texture that absorbs sweat perfectly. Plastic rings get dangerously slippery when your palms sweat. I hung them from a sturdy oak tree branch in my backyard. The first time I tried to do a simple ring dip, my arms shook so violently I thought my shoulders were going to dislocate. I couldn’t even hold the top support position for three seconds. The rings force every single tiny stabilizer muscle in your rotator cuff and core to fire simultaneously. It’s a completely different stimulus. Start by just holding the top position. Keep your arms locked out tight and turn your palms slightly forward. We call this turning the rings out. It creates intense, cramping tension in your biceps and chest. Eventually, you can progress to ring rows, deep push-ups, and the legendary muscle-up. Don’t rush it. I learned that the hard way. I strained my left pec trying to do deep ring flyes before my connective tissue was ready.

FitinOne Adjustable Folding Weight Bench for Home Gym
FitinOne Adjustable Folding Weight Bench for Home Gym punches above its price — 744 buyers rated it 4.5 stars. I would buy it again.
10. Add a Weighted Vest for Maximum Overload

When squats and lunges feel like light cardio instead of strength training, it’s time to add external load. Holding heavy dumbbells works, but it exhausts your grip long before your legs actually give out. A weighted vest solves this problem. I use the MiR Adjustable Weighted Vest. The 20 lb model costs $129.99. It’s made from thick, stiff 1200-D Nylon. It feels like military-grade canvas. The vest comes with small, solid iron weights that weigh 3 lbs each. You slide them into tight velcro pockets spread evenly across the chest and back. This distributes the load. I throw this vest on for my morning walks to Sprouts to grab my post-workout bananas and cold brew. It turns a simple 1-mile walk into a grueling leg and core session. I also wear it for strict push-ups. Adding 20 lbs to a strict, tempo push-up will blow up your chest and triceps faster than flat bench pressing. A huge mistake people make is buying a cheap, loose vest. If the vest bounces around when you move, the rough friction will rub your collarbones raw. I have the red scars to prove it. The MiR vest has two thick velcro straps that lock it tight against your ribs.
Building serious muscle and functional strength without an expensive gym membership is possible. You don’t need a basement full of bulky, squeaky machines. You just need pure intention, daily consistency, and a willingness to push through the uncomfortable burn of high-tension reps. I’ve transformed how my joints feel just by focusing on strict tempo, unilateral balance, and proper core bracing. If I had to recommend one single starting point, I’d tell you to grab those Clench resistance bands and the Iron Age pull-up bar right now. Those two tools alone will unlock hundreds of brutal exercise variations. Stop making excuses about not having time for the gym commute. Clear a 6-foot space on your living room rug, put your phone on do not disturb, and get to work. Save this page, pin it to your fitness board, and reference these specific tempo and form cues during your next session. You’ll feel the difference immediately.
Frequently Asked Questions
Can you actually build muscle with body weight workouts?
Yes. By utilizing strict tempo training, unilateral exercises, and progressive overload through tools like resistance bands or weighted vests, you can create the necessary muscle tension and micro-tears required for significant hypertrophy without heavy weights.
How often should I do body weight workouts?
Aim for 3 to 5 sessions per week. This allows enough frequency to stimulate muscle growth while providing adequate rest days. Ensure you focus on different muscle groups or incorporate active recovery days to prevent overtraining.
What is the best equipment to buy for a home calisthenics routine?
Start with a sturdy doorframe pull-up bar, a set of thick loop resistance bands, and a quality yoga mat. Once you progress, adding a weighted vest and wooden calisthenics rings will provide advanced instability and overload.
Why do my joints hurt during body weight exercises?
Joint pain usually stems from rushing reps, poor form, or muscular imbalances. Focus on a slow eccentric tempo, engage your core, and incorporate unilateral exercises to fix imbalances. Always warm up with mobility drills first.
