What’s Inside
- Prioritize Glute and Shoulder Ratios for Your Hourglass Body Workout At Home
- Master the Dumbbell Hip Thrust for Lower Body Curves
- Use Resistance Bands to Pre-Exhaust Your Glutes
- Sculpt Upper Body Width With Lateral Raises
- Build the Upper Back With Bent-Over Dumbbell Rows
- Stop Crunching Heavy Weights for Your Midsection
- Pilates-Inspired Core Control Over Dangerous Waist Trainers
- Fuel and Recover With Smart Gear and Protein
Last Tuesday at Whole Foods, I caught a glimpse of myself in the reflective glass of the dairy aisle. I was holding a 32 oz carton of almond milk, and I realized my torso looked like a perfectly straight block of wood. That’s when I knew I needed to completely overhaul my routine. Figuring out the perfect hourglass body workout at home became my absolute obsession. I’m Ryan. I test fitness gear and write about workouts for a living. I spent months doing endless heavy side bends, thinking I was carving my waist. I wasn’t. I was just building a thicker, blockier trunk. I learned that the hard way. I tried this wrong for months before figuring it out. You can’t just shrink your waist with crunches. You have to build the illusion of curves by growing your upper back, shoulders, and glutes. Let’s fix your routine. I’m going to walk you through exactly what works, what gear you actually need, and what you should throw in the trash. Skip the waist trainers. They smell like wet rubber and do absolutely nothing for your actual muscles. Here is exactly how to build a routine that actually gets results in your living room.
1. Prioritize Glute and Shoulder Ratios for Your Hourglass Body Workout At Home

Most people get this completely wrong. They think an hourglass figure comes from starving themselves or doing a thousand sit-ups. It doesn’t. To create the illusion of a smaller waist, you have to focus heavily on exercises that build muscle in your glutes, shoulders, and upper back. This strategy enhances your natural curves by improving your shoulder-to-hip ratio. Think of your body like an X-shape. If you widen the top of the X and the bottom of the X, the middle naturally looks smaller.
I learned this the hard way. I used to train a client who refused to touch upper body weights because she thought she’d get bulky. We spent three months doing nothing but lower body and core. Her legs got stronger, but her waist looked exactly the same. One afternoon, we were walking through Target, and I pointed out the mannequins in the athletic section. They all had broad shoulders. I finally convinced her to pick up a pair of 10 lb dumbbells. We started hitting shoulders twice a week.
Within a month, the visual difference was crazy. Her waist looked instantly tighter just because her shoulders were slightly wider. If you’re building an hourglass body workout at home, you need to dedicate at least two days a week to your upper body. I highly recommend grabbing some basic hex weights. The All In Motion dumbbells at Target are perfect for this. They cost around $5 to $35 per dumbbell depending on the weight, and the rubber coating doesn’t smell terrible like some of the cheaper brands. Focus on 3 to 5 sets of 8 to 12 repetitions for your main lifts. Don’t rush the process. Building muscle takes time, protein, and consistency.
2. Master the Dumbbell Hip Thrust for Lower Body Curves

If you aren’t doing hip thrusts, you’re leaving serious glute gains on the table. This exercise is highly effective for isolating and building the gluteal muscles without putting unnecessary strain on your lower back. You want to perform 3 to 5 sets of 8 to 12 repetitions. For added resistance, place a dumbbell straight across your hip crease.
I personally swear by adjustable dumbbells for this. The Bowflex SelectTech 552 dumbbells are incredible. You can usually find a single 25lb unit for about $100, though the full set is pricier. Another great option is the PowerBlock Dumbbells, which range from $100 to $500+ depending on how heavy you want to go. I bought my first set at Walmart years ago, and they still hold up.
Here is my honest mistake with hip thrusts. When I first started doing them at home, I rested a raw, knurled metal dumbbell directly on my pelvis. I woke up the next morning with massive purple bruises on my hip bones. It hurt to wear jeans. Don’t do this. Grab a folded yoga mat or a thick towel and place it under the weight. Set your shoulder blades right on the edge of your couch. Your shins should be perfectly vertical when you bridge up. Squeeze your glutes at the top for a full two seconds. If you don’t feel a deep, burning sensation in your backside, your foot placement is wrong. Move your feet a few inches forward or backward until you feel the tension shift entirely to your glutes. This is the absolute foundation of your lower body routine.
3. Use Resistance Bands to Pre-Exhaust Your Glutes

Resistance bands are completely underrated. They’re versatile and excellent for pre-exhaustion before you touch heavy weights. I use mini loop bands for movements like glute bridges, clamshells, and standing kickbacks. You can get heavy-duty bands from Rogue Fitness if you want serious tension, or just grab a budget-friendly pack on Amazon. They generally run between $10 and $30.
Last month, I was buying some post-workout snacks at Sprouts. I grabbed 4 oz of dried mango and a kombucha. My legs were so fried from a banded workout that I literally stumbled in the checkout line. That’s how effective these little pieces of rubber are. To get the most out of them, place the band just above your knees for bridges and clamshells. For kickbacks, wrap it right around your ankles.
A quick warning about cheap bands. I bought a flimsy rubber band once and tried to do a heavy monster walk. The band snapped right in half and whipped me across the thigh. It left a stinging red welt that lasted for three days. Spend the extra ten bucks to get fabric resistance bands with grippy strips on the inside. They won’t roll down your legs, and they won’t snap and hit you. I like to do 3 sets of 20 reps of banded clamshells right before I start my dumbbell squats. It wakes up the glute medius, which is the muscle right on the upper side of your hip. Growing that specific muscle is a massive secret to rounding out your hips at home. You might also like: 20 Creative Men Home Workout Ideas You’ll Want to Bookmark
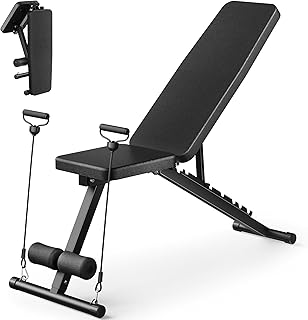
Adjustable Weight Bench for Home Gym
Adjustable Weight Bench for Home Gym punches above its price — 551 buyers rated it 4.5 stars. I would buy it again.
4. Sculpt Upper Body Width With Lateral Raises

Well-developed shoulders contribute significantly to the hourglass silhouette. If your shoulders are narrow, your waist will naturally look wider. It’s just basic visual math. To fix this, you need to fall in love with lateral raises. Use light dumbbells for this. You don’t need heavy weight to grow your side delts. A pair of 5-pound weights is usually plenty for beginners. Again, those All In Motion dumbbells from Target ($5 to $35) are great, or you can check the fitness aisle at Kroger. I’ve seen some decent, cheap weights there too.
You want to perform 3 to 5 sets of 8 to 12 repetitions. Focus on raising your arms out to the sides to form a “T” shape. Keep a slight bend in your elbows. You might also like: 15 Beautiful Photoshoot Home Workout Ideas to Steal Right Now
Honestly, this changed how I train completely. I used to grab 20-pound dumbbells and swing them up using all the momentum in my lower back. I looked like a bird trying to take off from a runway. My shoulders clicked loudly with every rep, and my neck was always stiff. I wasn’t growing my shoulders at all. I was just straining my traps. Drop the ego and drop the weight. Stand tall, brace your stomach, and lift the weights smoothly. Imagine you’re pouring a pitcher of water at the very top of the movement. Your pinky should be slightly higher than your thumb. The burn should be intense, right on the outside cap of your shoulder. If you feel it in your neck, you’re shrugging. Keep your shoulders pulled down and away from your ears. You might also like: 20 Brilliant Commercial Home Gym Setup Ideas Worth Trying This Year
5. Build the Upper Back With Bent-Over Dumbbell Rows

Building your lats and upper back muscles creates a wider upper frame. This directly emphasizes a cinched waist. If you look at professional bikini competitors, they all have incredibly developed upper backs. You need to incorporate bent-over dumbbell rows into your routine. Perform 3 sets of 12 repetitions. Row the dumbbells back toward your hips, not straight up to your chest. Consciously squeeze your shoulder blades together at the top of the movement.
If you’re serious about your home gym, this is where adjustable weights shine. The NÜOBELL Adjustable Dumbbells are fantastic for precise weight increments. They cost between $300 and $700, but they replace an entire rack of weights. They feel like traditional gym dumbbells with flat metal heads.
I have a terrible habit of working out in my socks. Last winter, after a massive Costco run where I bought 10 lbs of frozen chicken breast for meal prep, I decided to do a quick back workout in my living room. I was tired, my grip slipped, and I dropped a 30 lb dumbbell directly on my big toe. The throbbing pain was blinding. I couldn’t wear closed-toe shoes for a week. Always wear proper training shoes, even in your living room. When doing your rows, keep your back completely flat. If your lower back rounds like a frightened cat, you’re going to injure yourself. Hinge at the hips, keep your chest pointing at the floor, and pull your elbows straight back. The mind-muscle connection here is everything. Try to crush a walnut between your shoulder blades on every single rep.
6. Stop Crunching Heavy Weights for Your Midsection

A very common mistake is using heavy weights for oblique exercises. Things like weighted side bends or heavy Russian twists can actually thicken your waistline. Your obliques are muscles. When you train them with heavy resistance, they grow larger. If your goal is a tiny waist, building thick, blocky obliques is the exact opposite of what you want. Instead, focus on exercises that promote core control and stability without adding bulk.
You need to utilize bodyweight core exercises for waist definition. Exercises like side planks and bicycle crunches effectively target the obliques and transverse abdominis. This helps create a toned and slender midsection. Incorporate side plank hip lifts for 10 to 12 repetitions per side. Add bicycle crunches for 3 sets of 10 to 20 repetitions.
I used to grab my Core Home Fitness Adjustable Dumbbells (which run about $300 to $700) and do side bends until my eyes watered. I was standing in the checkout line at Kroger a few months later, looking at a fitness magazine, and I realized my waist was wider than the guy on the cover. I completely dropped weighted core work that day. Now, I stick strictly to stabilizing movements. When you do a side plank, make sure your elbow is directly underneath your shoulder. Don’t let your hips sag toward the floor. Keep your body in a perfectly straight line from your nose to your toes. The burn should feel deep and controlled, not sharp. If you feel tension in your lower back, drop to your knees and modify the plank until your core gets stronger.

FitinOne Adjustable Folding Weight Bench for Home Gym
FitinOne Adjustable Folding Weight Bench for Home Gym punches above its price — 774 buyers rated it 4.5 stars. I would buy it again.
7. Pilates-Inspired Core Control Over Dangerous Waist Trainers

Please, avoid waist trainers if you want lasting results. While waist trainers offer a temporary visual change by physically compressing your midsection, they do not reduce body fat. They won’t permanently alter your body shape. Medical experts constantly warn that prolonged use can lead to serious health risks. We’re talking breathing difficulties, digestive issues, and even organ damage.
My girlfriend bought a cheap waist trainer online a few years ago. As a joke, I tried to strap it on before we drove to Trader Joe’s. It smelled intensely of cheap neoprene and sweat. I couldn’t expand my ribs to breathe, and my stomach started cramping within five minutes. I ripped it off before we even backed out of the driveway. Focus on sustainable diet and exercise for genuine, lasting changes.
Instead of a corset, integrate Pilates-inspired core control. Pilates focuses on deep core engagement and strengthening the transverse abdominis. This muscle acts like a natural, internal corset. It pulls your stomach in tight without adding bulky muscle to your waist. Incorporate moves like the Pilates “hundred” into your routine. Lie on your back, float your legs up to a tabletop position, and curl your head and shoulders off the mat. Pump your arms vigorously up and down while inhaling for five counts and exhaling for five counts. Do this for 100 total arm pumps. It looks incredibly easy, but by count 60, your abs will be screaming. This is how you actually train your stomach to lay flat.
8. Fuel and Recover With Smart Gear and Protein

You can’t build curves if you aren’t eating enough protein and recovering properly. Adequate protein consumption is fundamental for muscle repair and growth. This is essential for body recomposition. You need to aim for 1.8 to 2 grams of protein per kilogram of body weight daily. I usually mix 1 scoop of whey protein with 8 oz of cold water and 2 tablespoons of peanut butter immediately after I train. It tastes like a milkshake and gets the job done.
You also need to incorporate foam rolling for enhanced recovery. It’s a surprising yet effective tip. Foam rolling can significantly reduce muscle soreness, improve flexibility, and increase blood flow. Spend 10 minutes post-workout using a dense foam roller. You can easily find one on Amazon for $15 to $50.
I used to skip stretching completely. I’d finish a workout, drink my shake, and sit at my desk. One night, I woke up screaming because my right calf locked up in a massive cramp. I hadn’t been drinking water, and my muscles were incredibly tight. Now, I aim for 7 to 9 hours of quality sleep per night and drink at least 2 to 3 liters of water daily. I also foam roll my glutes, quads, and upper back every single evening. When you roll, find a tender spot and just hold your bodyweight on it for 30 to 60 seconds. It hurts. It feels like a deep tissue massage you didn’t ask for. But when you stand up, your legs will feel completely brand new. Pair this recovery with compound lower body movements like dumbbell squats (3 sets of 8 to 12 reps) and side lunges (3 sets of 10 to 12 reps per side), and you’ll see massive changes.
Building an hourglass shape at home takes time, heavy lifting, and a lot of food. You can’t out-train a bad diet, and you can’t build muscle if you’re constantly starving yourself. Grab a pair of adjustable dumbbells, eat your protein, and stay consistent with your shoulder and glute training. I highly recommend taking progress photos every two weeks in the same lighting. You won’t notice the day-to-day changes in the mirror, but the photos will prove that the work is paying off. If you found this helpful, pin this article to your fitness board so you have the exact sets and reps saved for your next living room workout.
Frequently Asked Questions
Can I really get an hourglass figure working out at home?
Yes. By using dumbbells and resistance bands to target your glutes, shoulders, and upper back, you can build muscle that creates the illusion of a smaller waist. Consistency and progressive overload are key to seeing results without a commercial gym.
Should I use a waist trainer during my home workouts?
No. Waist trainers only compress your midsection temporarily and can cause breathing and digestive issues. Focus on strengthening your transverse abdominis with Pilates-inspired core exercises to naturally pull your stomach in tight.
What size dumbbells do I need for this routine?
I recommend a light pair (5-10 lbs) for shoulder exercises like lateral raises, and a heavier pair or adjustable set (up to 25-50 lbs) for lower body movements like squats and hip thrusts.
Will heavy core workouts make my waist smaller?
No. Using heavy weights for oblique exercises like side bends can actually build thicker muscle, making your waist look wider. Stick to bodyweight stabilizing moves like side planks and bicycle crunches for a toned midsection.
