What’s Inside
- Invest In Quality Adjustable Dumbbells For Your Upper Body Dumbbell Workout
- Master Dumbbell Bench Press Form: Elbow Angle Is Key
- Implement Micro-Loading For Consistent Progressive Overload
- Incorporate Unilateral Training To Correct Imbalances
- Focus On The Eccentric Phase For Bicep Growth
- Protect Your Wrists During Heavy Pressing
- Use Proper Footwear For Standing Exercises
- Fuel Your Upper Body Dumbbell Workout Properly
I dropped a rusty 35-pound hex dumbbell directly onto my left big toe last February in my freezing garage. That sharp, throbbing pain was the exact moment I realized my upper body dumbbell workout needed a serious overhaul. I was using a mismatched set of weights I bought off a guy on Craigslist back in 2018. The metal knurling was worn completely smooth from years of use. My hands smelled like loose change and old iron every single time I lifted. The floor was covered in dust, and I had no real structure to my training. You don’t need a massive commercial gym setup with expensive cable machines and giant squat racks to build muscle. You just need a solid plan and the right equipment. I spent years doing random bicep curls and sloppy shoulder presses without seeing any real progress. I’d stare at the mirror, flex, and wonder why my chest was still entirely flat. It took a lot of painful trial and error—learned that the hard way. I injured my shoulder, strained my wrists, and wasted money on useless fitness gear. I’m sharing the specific strategies that actually worked for me. Let’s fix your routine so you don’t waste your time and start seeing actual results.
1. Invest In Quality Adjustable Dumbbells For Your Upper Body Dumbbell Workout

Maximize your workout space and your budget by opting for adjustable dumbbells. I used to have a massive rack of individual hex dumbbells that took up half my garage wall. They gathered dust, spiderwebs, and took up way too much floor space. I finally sold them all and bought the Bowflex SelectTech 552 adjustable dumbbells. They cost me exactly $399 on Amazon. The weight range goes from 5 to 52.5 lbs per dumbbell. They effectively replace 15 sets of traditional dumbbells, which clears up a massive amount of room. The dial mechanism makes a very satisfying, heavy click when you change the weight. The metal grip has a slightly rubberized texture that feels secure even when my hands are sweating heavily during a tough set. There is a catch, though. The Bowflex dumbbells are quite long. They measure about 15.75 inches from end to end, regardless of the weight you select. This makes them a bit awkward for certain movements like standard bicep curls because the plastic ends can bump into your hips. If you plan on needing heavier weights eventually, the PowerBlock Elite EXP Stage 1 is a better long-term choice. Those provide 5 to 50 lbs per hand and are expandable up to 90 lbs. They usually cost around $339. The PowerBlocks have a square, blocky design. I tried a pair at a friend’s house last month. The handle is surrounded by four padded bars. It feels a little claustrophobic on your wrists at first. I tried buying cheap plastic sand-filled weights at Target for $19.99 back in college. That was a huge mistake. The plastic cracked within a month and leaked fine black sand all over my apartment carpet. Stick to the quality iron and steel options. They cost more upfront, but they won’t ruin your floor.
2. Master Dumbbell Bench Press Form: Elbow Angle Is Key

A common mistake in the dumbbell bench press is flaring your elbows too wide. I did this wrong for years. I used to flare my elbows out to a full 90 degrees because I thought it stretched my chest muscles more effectively. I ended up with a sharp, pinching pain in my front deltoid every time I reached for a top shelf in my kitchen. I smelled like Icy Hot for six months straight. To maximize chest engagement and protect your shoulder joints, you need to keep your elbows tucked to a 45-60 degree angle away from your body. Fitness coach Jeremy Ethier emphasizes this specific elbow position for optimal chest activation. You also need to actively retract and depress your shoulder blades before you start pressing. Imagine you’re trying to pinch a pencil between your shoulder blades. Keep that tension tight. Ensure your forearm remains perfectly vertical over your elbow throughout the entire movement. I practice this on my REP Fitness AB-3000 adjustable bench. It cost me $319. The vinyl padding is thick and extremely grippy, so my shoulders don’t slide around when I sweat. If your bench is too slick, you lose all your stability. I remember doing flat presses on a cheap, slippery bench I bought at Walmart. My shoulder blades slid completely out of position on the very first rep. I tweaked my rotator cuff and couldn’t lift a gallon of milk without wincing the next day when I was shopping at Sprouts. Keep your feet planted flat on the floor, squeeze your glutes, and drive the weight up in a slight arc. Don’t smash the dumbbells together at the top. That just takes the tension off your chest and chips the paint off your expensive weights.
3. Implement Micro-Loading For Consistent Progressive Overload

To continually build strength and break through stubborn plateaus, you have to gradually increase your weights. You can’t just jump from 40 lbs to 50 lbs on a seated shoulder press and expect your form to hold together. I hit a massive wall at 45 lbs for my overhead presses. Trying to push the 50 lb dumbbells felt like trying to lift a parked car. My lower back arched aggressively off the pad, and my left arm completely gave out halfway up. I felt incredibly defeated. I remember driving to Whole Foods right after that workout and buying an overpriced $8 green juice just to cope with my frustration. Instead of jumping by 5 lbs at a time, you need to add increments as small as 1.25 lbs per dumbbell. This is called micro-loading. I bought the Micro Gainz Dumbbell Fractional Weight Plates. A 2-plate set of the 1.25lb plates costs exactly $54.99. They’re small, black steel discs with a thick rubber clasp that snaps directly onto the metal handle of your dumbbell. The spring-loaded clasp is very stiff. You have to squeeze it hard to get it over the thick handle. This approach ensures steady progress without risking form breakdown. The only negative is that the plates can slide around slightly on the handle if you drop the weights too hard on your knees after a heavy set. You have to handle them with a bit of care. I’ve used these plates for two years now. Adding just 2.5 lbs total to my pressing movements allowed me to finally push past my plateau. It sounds like a tiny amount of weight, but your shoulder muscles are small. They can’t handle massive jumps. Micro-loading keeps your joints safe while forcing your muscles to adapt. You might also like: 15 Creative Workout Motivation Tips You Haven’t Thought Of
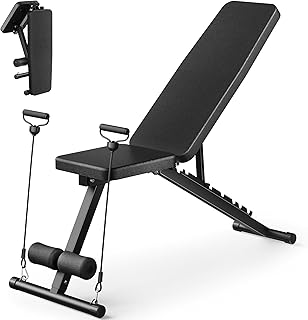
Adjustable Weight Bench for Home Gym
Adjustable Weight Bench for Home Gym punches above its price — 551 buyers rated it 4.5 stars. I would buy it again.
4. Incorporate Unilateral Training To Correct Imbalances

You need to include single-arm exercises in your routine. Think single-arm dumbbell rows, single-arm overhead presses, or single-arm dumbbell bench presses. This approach addresses muscular imbalances and significantly improves your core stability. I didn’t realize how lopsided my strength was until I started doing heavy single-arm rows on a flat bench. I was pulling a 50 lb dumbbell with my right arm for ten easy reps. When I switched to my left arm, my hand started shaking violently at rep number six. I couldn’t even pull the weight up to my ribcage. My left side was drastically weaker. Unilateral training forces each side of your body to carry its own weight. You can’t rely on your dominant side to compensate for the weaker side. For heavy rows, grip strength often fails before your back muscles actually fatigue. I use Harbinger Padded Cotton Lifting Straps to solve this. They cost $14.99 at most sporting goods stores. The rough texture of the 21.5-inch cotton strap digs into your wrist slightly, but the thick neoprene padding prevents it from cutting off your circulation. The strap wraps around the dumbbell handle, locking your hand securely in place. I tried doing single-arm presses while sitting on an exercise ball once. That was a terrible idea. I lost my balance on the third rep and rolled backward entirely onto my hard floor. Keep your feet planted firmly on solid ground. When you do a single-arm standing press, your core has to work in overdrive to keep your torso from twisting. I do these in front of a mirror to ensure my spine stays perfectly straight. It’s incredibly humbling. I usually drink a Premier Protein shake from Costco right after these sessions because they completely drain my central nervous system. You might also like: 10 Calisthenics Workout Plan for Every Budget
5. Focus On The Eccentric Phase For Bicep Growth

Stop dropping the weight quickly when you do bicep curls. The lowering portion of the movement is called the eccentric phase. That is where a massive amount of muscle damage and growth actually occurs. I used to rush my curls because I wanted to finish my workout quickly. I’d swing the weights up like a pendulum and let gravity pull them down in one second flat. I was basically doing cardio with dumbbells. I rushed because I needed to get to Costco before they closed to buy my bulk $17.99 packs of frozen chicken breasts. Once I slowed down, my arms actually started growing. Try taking a full three to four seconds to lower the dumbbell back to your starting position. It burns intensely. To make this even harder, I attach Fat Gripz Original to my dumbbells. They cost $29.95. They’re thick, blue rubber cylinders with a slit down the middle. You pry them open and snap them over the metal dumbbell handle. They increase the outer diameter of the grip to exactly 2.25 inches. Squeezing that thick, military-grade rubber compound forces your forearms and biceps to contract much harder. The downside is that they make your forearms burn so badly you might accidentally drop the weight. You have to reduce the weight you normally use by at least 10 lbs when you first try them. I tried using them on a 40 lb dumbbell and my grip failed instantly. The rubber also smells a bit like car tires when you first take them out of the box—no exaggeration. Wash them with warm dish soap before you use them. Slowing down your reps and thickening your grip will completely alter how your arms respond to a basic curl. You might also like: 8 Leg Workout Gym for Every Budget
6. Protect Your Wrists During Heavy Pressing

Heavy dumbbell rows and overhead presses put a massive amount of strain on the tiny bones and tendons in your wrist joint. If your wrist bends backward during a heavy press, you lose power and risk a serious sprain. I learned this the hard way. I sprained my right wrist trying to forcefully clean a pair of 60 lb dumbbells into position for a seated shoulder press. My wrist bent back sharply, and I heard a quiet pop. I had to wear a stiff medical brace for three weeks. I spent that entire time walking around Kroger buying frozen pizzas and pre-made salads because I couldn’t even chop vegetables. Now, I always maintain a neutral wrist alignment. Your knuckles should point straight at the ceiling. To enforce this, I wear Gymreapers Stiff Wrist Wraps. They cost $19.99 for a pair. The material is a stiff, slightly scratchy nylon blend with a very thick 18-inch velcro strap. You anchor the reinforced elastic loop around your thumb, wrap the fabric tightly around your wrist joint, and secure the velcro. They act like a temporary cast. The negative is that if you wrap them too tightly, your fingers will start tingling within two minutes. You have to loosen them between sets to let your blood flow back into your hands. I previously bought a cheap, flimsy pair of wraps at Walmart for $9.99. The elastic frayed and the velcro stopped sticking after exactly one week of use. Don’t cheap out on joint support gear. Wrapping your wrists gives you the confidence to push heavier weights without worrying about your joints collapsing under the intense pressure. It makes the dumbbell feel like a natural extension of your forearm.

Hezeyferg 22LBS Adjustable Dumbbells Set
Hezeyferg 22LBS Adjustable Dumbbells Set punches above its price — 305 buyers rated it 4.5 stars. I would buy it again.
7. Use Proper Footwear For Standing Exercises

Standing overhead presses and heavy upright rows require a completely solid base. You shouldn’t wear thick, squishy running shoes when you lift weights. Running shoes are specifically designed to absorb impact, which means their foam soles compress unevenly under heavy loads. I tried doing heavy standing dumbbell presses in my thick-soled Hoka running shoes last year. As I pushed the weights over my head, the thick foam compressed under my heels. I leaned back too far, completely lost my balance, and stumbled backward awkwardly. I almost put a 45 lb dumbbell straight through my garage drywall. You need a flat, hard sole that connects you directly to the floor. I wear basic Converse Chuck Taylors. They cost $65. The flat vulcanized rubber sole and the stiff canvas upper provide zero cushioning, which is exactly what you want. Your foot stays perfectly flat, and you can actively grip the floor with your toes for maximum stability. Vans work just as well for this. The major downside to Converse is the total lack of arch support. They’re terrible for walking long distances. Don’t wear them if you plan on walking your dog for two miles after your workout. I made that mistake once and my shins ached for two days straight. I usually just take them off as soon as I finish lifting. Sometimes I lift barefoot if my garage floor isn’t freezing cold. Feeling the ground helps you activate your glutes and brace your core properly. Next time you do a standing upper body exercise, look down at your feet. If your shoes look like thick marshmallows, take them off. I guarantee you’ll feel instantly more stable and capable of pressing more weight.
8. Fuel Your Upper Body Dumbbell Workout Properly

You can’t build muscle if you don’t eat enough protein and carbohydrates. Nutrition dictates how well you recover from tearing your muscle fibers during a heavy session. I used to work out completely fasted at 6:00 AM. I thought it would help me burn more fat. Instead, I’d get dizzy and weak halfway through my sets. I remember standing in the snack aisle at Trader Joe’s after a grueling fasted workout, shaking slightly, just staring blankly at the $3.99 jars of Speculoos cookie butter. My blood sugar was completely crashed—took me years to figure out that lesson. Now, I always eat a ripe banana and drink a protein shake about forty-five minutes before I lift. I use Optimum Nutrition Gold Standard 100% Whey Protein Powder. The Double Rich Chocolate flavor costs $44.99 for a 2 lb tub. It provides 24 grams of protein and 5.5 grams of BCAAs per scoop. I mix one scoop with 8 ounces of cold water. It mixes perfectly in a standard shaker bottle without leaving any gritty, dry clumps at the bottom. The taste is mildly sweet, not overpowering. Skip the fat-free, heavily processed protein bars. They usually taste like wet cardboard and sit like a heavy brick in your stomach while you train. The only negative with whey protein is that it can cause slight bloating if you drink it too fast. Sip it slowly. After my workout, I focus on real food. I eat a large meal with grilled chicken, white rice, and steamed broccoli. I buy the massive 25 lb bags of jasmine rice from Costco because I go through them so quickly. Your muscles need those carbohydrates to replenish the glycogen you just burned through lifting heavy dumbbells. Treat your nutrition with the exact same focus you apply to your lifting form.
Building a stronger chest, back, and arms doesn’t require a complicated machine circuit at a crowded gym. A solid upper body dumbbell workout, executed with strict form and consistent progression, will yield incredible results. I wasted a lot of time doing things wrong. I flared my elbows, rushed my reps, and lifted in the wrong shoes. Once I fixed those specific details, my strength skyrocketed. Grab a pair of adjustable dumbbells, focus on the eccentric phase, and start tracking your weights meticulously. You won’t see changes overnight, but if you stick to the plan, your shirts will definitely fit differently in a few months. Save this guide for your next garage gym session, and pin it to your fitness board so you don’t forget the proper elbow angles. Let’s get to work.
Frequently Asked Questions
How often should I do an upper body dumbbell workout?
Aim for two to three times a week. Your muscles need about 48 hours of rest between sessions to recover and grow properly. Overtraining can lead to joint pain and stalled progress.
What weight should I start with for dumbbell bench press?
Start with a weight you can press for 10 to 12 reps with perfect form. For most beginners, this is usually between 15 and 25 lbs per hand. Prioritize your elbow angle over the heavy weight.
Can I build chest muscle without a barbell?
Yes. Dumbbells actually allow for a greater range of motion and better chest activation than barbells. They also force each side of your chest to work independently, preventing muscular imbalances.
Why do my shoulders hurt during overhead presses?
You might be flaring your elbows too wide or using a weight that’s too heavy, which forces improper joint mechanics. Keep your elbows slightly tucked and ensure your wrists remain perfectly straight.
