
What’s Inside
- The Resistance Band Pull-Apart (A Back Fat Workout Staple)
- Heavy Dumbbell Rows on the Costco Bench
- Superman Holds on a Proper Mat
- Kettlebell Halos for Upper Back Mobility
- Inverted Rows (The Back Fat Workout Secret)
- Renegade Rows with Hex Dumbbells
- Cable Face Pulls (Gym or Home Setup)
- Farmer’s Carries for Total Body Tension
- Swimming (The Ultimate Low-Impact Finisher)
Last Tuesday at Target, I grabbed a medium Goodfellow fitted tee for $9.99 off the clearance rack. I pulled it over my head in the cramped fitting room. The harsh fluorescent lighting hit my back in the three-way mirror. I saw a distinct, soft roll of tissue spilling over my waistband. Even as a fitness trainer, my posture had slipped from hunching over my laptop writing gear reviews for hours on end. My lats were weak. My lower traps were basically non-existent. I realized I needed a dedicated back fat workout immediately. Most guys and girls ignore their backs entirely because they can’t see them in the mirror. We focus on the chest, arms, and abs. That’s a massive mistake. A strong back pulls your shoulders down, smooths out your posture, and burns a ridiculous amount of calories because the muscle groups are absolutely huge. I spent the next three months testing different pulling movements in my garage gym and local commercial spaces. I threw out the complicated machines. I focused on raw, effective movements that actually target the stubborn areas around the bra line and lower back. This guide strips away the fluff. You’ll find exactly what gear I used, how much it cost, and the exact mistakes I made so you don’t repeat them. Let’s get into the actual routine.
1. The Resistance Band Pull-Apart (A Back Fat Workout Staple)

I used to skip warmups entirely. I’d walk into the gym, grab heavy iron, and immediately pull a muscle in my neck. Learned that the hard way. Now, I start every single session with resistance band pull-aparts. You need a band that offers smooth, consistent tension. I bought the SPRI Superband for $14.98 at Target three weeks ago. The rubber is thick and smells like a fresh, rubbery new car tire. It doesn’t snap back aggressively like the cheap, thin latex ones do. Grab the band with both hands about shoulder-width apart. Keep your arms completely straight. Squeeze your shoulder blades together and pull the band apart until it physically touches your sternum. The burn hits right between your shoulder blades after about fifteen reps. A common mistake is shrugging your shoulders up to your ears. Drop your shoulders. Pretend you’re trying to tuck your shoulder blades into your back pockets. If you use a band that’s too heavy, your form breaks down instantly. I tried using a heavy green Rogue band once and ended up arching my lower back so hard I cramped for ten minutes. Stick to a light resistance. You want high reps here. Aim for three sets of twenty reps. This movement pumps blood into the rhomboids and rear delts. It wakes up the exact muscles you need for a highly effective back fat workout. I keep my SPRI band in my gym bag permanently now.
2. Heavy Dumbbell Rows on the Costco Bench

You can’t build a strong back without heavy rows. Period. I do these on a Fitness Reality adjustable bench I picked up for $129.00 at Costco last November. The black vinyl is slightly slippery when I sweat, but the steel frame is rock solid. For the weight, I use CAP Barbell 35-pound hex dumbbells. I grabbed a pair for $39.99 each at Walmart. Place your left knee and left hand on the bench. Keep your back completely flat. Your torso should be parallel to the floor. Grab the dumbbell with your right hand. Pull it up to your hip, not your chest. This is where most people get it completely wrong. If you pull to your chest, you engage your biceps and front delts. You want to drag the weight backward toward your waistline to hit the lats. The knurling on these CAP dumbbells is sharp. It bites into my calluses, which I actually prefer because my grip won’t fail before my back does. I tried using smooth neoprene weights for this once at a hotel gym. They slipped right out of my sweaty hands and nearly crushed my left toe. Go heavy on these. You’re working a massive muscle group. I aim for four sets of eight to ten reps per arm. If you aren’t breathing hard after a set, you need a heavier dumbbell. This exercise physically thickens the back muscles, pulling the skin tighter over the area.
3. Superman Holds on a Proper Mat

The lower back is the hardest spot to target effectively. Superman holds isolate the erector spinae muscles perfectly. You don’t need weights for this, but you absolutely need a decent mat. I used to do these on my bare living room hardwood floor. My hip bones bruised so badly I couldn’t sleep on my stomach for a week. I went to Whole Foods and bought a Gaiam 6mm Yoga Mat for $29.99. It has a slightly sticky, textured surface that keeps me from sliding around when the sweat starts dripping. Lie face down on the mat. Extend your arms straight out in front of you. Squeeze your glutes and lift your arms, chest, and legs off the floor simultaneously. Hold that top position for three full seconds. You’ll feel a deep, uncomfortable cramping sensation in your lower back. That means it’s working. Lower back down slowly. Do not jerk your body up. I see people violently throwing their limbs into the air at the gym. That’s a fast track to a serious spinal injury. Control the movement. I do three sets of fifteen reps. Honestly, this exercise is incredibly boring. I hate doing it. I stare at the purple rubber of my Gaiam mat and count the seconds in my head. But it works. It strengthens the entire posterior chain and improves your upright posture. Better posture instantly reduces the appearance of rolls on your back. You might also like: 11 Workout Routine At Home That Actually Work
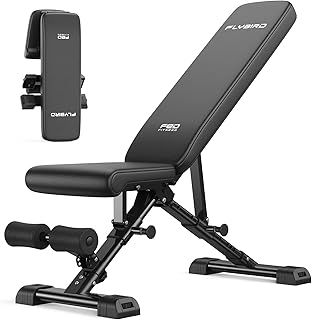
FLYBIRD WB5 Weight Bench
If you want something that just works, FLYBIRD WB5 Weight Bench is a safe bet (259 reviews, 4.5 stars).
4. Kettlebell Halos for Upper Back Mobility

Stiff shoulders make it impossible to train your back properly. If you can’t reach overhead without pain, your lats won’t engage. Kettlebell halos fix this issue entirely. I bought a Yes4All 15-pound kettlebell for $22.50 at the Kroger Marketplace near my house. The cast iron handle is wide enough for both of my hands, and the matte black finish doesn’t chip when I accidentally knock it against the concrete floor. Hold the kettlebell upside down by the horns (the vertical sides of the handle). Keep it right in front of your chin. Slowly circle the weight around your head. Keep the bell as close to your skull as possible. You should almost brush your hair with it. As you move the weight behind your head, you’ll feel an intense stretch through your triceps and lats. A massive pro tip here: keep your core braced tightly. Do not let your ribcage flare out. I used to do these with a 35-pound bell, arching my back like a gymnast to get the heavy weight around. My lower back hurt for days afterward. Keep the weight light. The 15-pound Yes4All bell is perfect for this mobility work. I do ten circles clockwise, then ten counter-clockwise. This movement greases the shoulder joints and wakes up the upper back stabilizers. It’s a mandatory prep movement before moving into heavier pulling exercises. You might also like: 11 Gym Asthetic Picture That Actually Work
5. Inverted Rows (The Back Fat Workout Secret)

Pull-ups are way too hard for most beginners. Lat pulldowns require a bulky, expensive machine. Inverted rows are the perfect middle ground. I do these using a TRX GO Suspension Trainer. I paid $139.95 for it at Target. The nylon straps are incredibly durable, and the foam handles soak up sweat without smelling gross over time. I anchor the TRX to my heavy garage door track. You can also use the included door anchor inside your house. Lean back while holding the handles until your arms are straight. Walk your feet forward to increase the difficulty. Pull your chest up to the handles. Squeeze your shoulder blades together hard at the top. I tried doing these under a dining room table once because I saw it on a fitness blog. I grabbed the edge of the wood, pulled up, and the table tipped over, spilling a pitcher of ice water everywhere. Stick to the TRX. The beauty of the inverted row is the instantly adjustable difficulty. If you’re tired, just take one step backward. The angle changes, and the row gets easier. I usually burn out on these at the end of my session. I’ll do three sets to absolute failure. My lats feel like they’re on fire, and my grip usually gives out before my back does. This is a phenomenal way to add pulling volume without overloading your central nervous system. You might also like: 20 Inspiring Outfit Home Workout Ideas That Changed Everything
6. Renegade Rows with Hex Dumbbells

This movement destroys your core and your lats simultaneously. You need hex dumbbells for this. Do not attempt this with round dumbbells. I tried it with a pair of round 20-pounders I found in a dusty hotel gym. As soon as I shifted my weight, the dumbbell rolled. My wrist buckled, and I face-planted directly into the carpet. It was embarrassing and painful. I use my Amazon Basics 20-pound hex dumbbells for this now. I ordered them online, but I also grabbed a Manduka cork yoga block for $19.99 at Sprouts to place between my hands as a visual target. Get into a push-up position with your hands gripping the dumbbells. Your feet should be wide for balance. Shift your weight slightly to the left and row the right dumbbell up to your hip. Place it down softly. Repeat on the other side. The hardest part isn’t the row. The hardest part is keeping your hips from twisting. Imagine you have a glass of water resting on your lower back. If you twist, it spills. I have to physically brace my stomach as if someone’s about to punch me. I do three sets of eight reps per side. The knurled handles on the Amazon Basics weights dig into my palms, but the flat rubber heads provide a perfectly stable base.

NICEPEOPLE Adjustable Weight Bench for Home Gym
If you want something that just works, NICEPEOPLE Adjustable Weight Bench for Home Gym is a safe bet (33 reviews, 4.5 stars).
7. Cable Face Pulls (Gym or Home Setup)

If I had to pick one exercise for posture, it’s the face pull. It specifically targets the rear deltoids and the external rotators of the shoulder. Most people have weak rear delts from typing all day. I set this up in my garage using a Spud Inc pulley system, but you can easily replicate it with resistance bands. I use a Rogue Tricep Rope that cost me $25.00, attached to a heavy-duty carabiner. You can also buy a simple door anchor for $9.99 at Walmart and loop a resistance band through it. Grab the rope with both hands. Step back to create tension. Pull the center of the rope directly toward the bridge of your nose. As you pull, rotate your knuckles backward. Your arms should look like you’re hitting a double bicep pose at the end of the movement. Most people pull with their biceps and drag the rope down to their chin. That ruins the exercise. You want the tension high up on the shoulders. The coarse nylon rope always rubs against my knuckles, leaving them a bit raw, so I started wearing simple Mechanix gloves. I hit three sets of fifteen reps. This movement burns intensely. It pulls your shoulders back, immediately making your upper back look leaner and more defined.
8. Farmer’s Carries for Total Body Tension

Walking with heavy weights sounds too simple to actually work. It isn’t. Farmer’s carries force every single muscle in your back to contract statically to keep your spine upright. I grab two 40-pound dumbbells for this. Before I start, I mix a packet of Lemon Lime Liquid IV (a 16-pack costs $15.99 at Trader Joe’s) into my water bottle. The electrolytes keep my forearms from cramping up under the heavy load. Pick up the weights. Stand as tall as humanly possible. Pull your shoulders down and back. Walk forty yards. My driveway is exactly twenty yards long, so I walk down and back. The friction of the heavy metal handles tears up my calluses. By the end of the walk, my traps are screaming, and my forearms feel like they’re filled with lead. Do not let the weights rest against your thighs. Keep them an inch away from your body. If you let them bounce off your legs, you lose the tension in your lats. I once tried carrying 70-pound kettlebells. My grip failed halfway down the driveway, and I dropped one on the concrete, chipping it badly. Stick to a weight you can control for the entire distance. I do four rounds of this. It taxes your cardiovascular system heavily, making it a great fat-burning addition.
9. Swimming (The Ultimate Low-Impact Finisher)

Lifting weights builds the muscle, but you need cardiovascular work to reveal it. Swimming is entirely upper-body dominant. It forces your lats, traps, and rhomboids to pull you through the water. I hit the local YMCA pool twice a week. I wear Speedo Vanquisher 2.0 goggles. I bought them for $21.99 at Target. They have a tight silicone seal that actually keeps the harsh chlorine out of my eyes. I used a cheap pair of gas-station goggles once on a beach vacation. They leaked immediately, and my eyes burned for two days. I swim freestyle for twenty minutes straight. The water resistance provides a continuous, low-impact burn. You feel the stretch in your lats every time you reach forward. The pull phase mimics a lat pulldown perfectly. I usually swallow a mouthful of pool water at least once a session when I turn to breathe poorly. It tastes like chemicals and regret. No exaggeration. But the physical results are undeniable. Swimming elongates the back muscles and burns a massive amount of calories without pounding your joints. If you hate running on a treadmill, get in the pool. It’s the perfect complement to your heavy rowing days and ties the whole routine together.
Building a strong, defined back takes time. You won’t see changes in a week. I stared at the mirror for two months before I finally noticed my posture had shifted and the fabric of my shirts laid flat across my shoulders. Consistency is the only metric that matters. Stick to these nine movements. Buy the basic gear. Put the reps in. Save this pin to your fitness board so you can pull it up during your next gym session. Let’s get to work.

OLIXIS Adjustable Weight Bench for Full Body Strength
If you want something that just works, OLIXIS Adjustable Weight Bench for Full Body Strength Training is a safe bet (39 reviews, 4.5 stars).
Frequently Asked Questions
Can I target back fat specifically?
You can’t spot-reduce fat in specific areas, but a back fat workout builds the underlying muscle. Growing your lats and rhomboids tightens the skin and improves your posture, which drastically reduces the appearance of back rolls.
How often should I do a back fat workout?
I recommend training your back two to three times a week. Your back muscles are large and recover quickly. Consistency with heavy pulling movements is required to see physical changes in your posture and muscle tone.
Do I need heavy weights to tone my back?
You need enough resistance to challenge the muscle. While resistance bands are great for warmups, you’ll eventually need dumbbells or a TRX to provide enough load. If a set of ten reps feels easy, the weight is too light.
Why does my lower back hurt during rows?
Lower back pain during rows usually means your core isn’t braced or you’re using too much weight. Drop the weight, keep your spine completely flat, and consciously tighten your stomach muscles before you start the pulling motion.
